


20 308351
Displacement Pump Service
Disassembly
When disassembling the pump, lay out all the removed
parts in sequence, to ease reassembly. Clean all parts
with a compatible solvent and inspect them for wear or
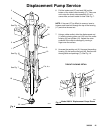
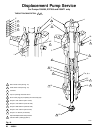
damage. Refer to Fig. 9 for a cutaway view of the
pump.
NOTE: Packing Repair Kits are available. See page
36. For the best results, use all the new parts in the kit.
Kit parts are marked with an asterisk, for example (7*).
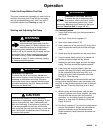
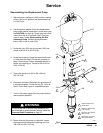
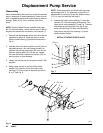
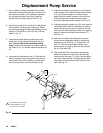
1. Remove the displacement pump from the motor as
explained on page 18. Place the pump in a vise,
with the outlet housing (9) positioned as shown in
Fig. 8.
2. Hold the flats of the priming piston rod (18) with an
adjustable wrench, and use a second wrench to
unscrew the priming piston seat (22) from the rod.
Slide the priming piston (21) off the rod. Inspect
the inner and outer surfaces of the piston (21) for
scoring, wear, or other damage.
3. Loosen the packing nut (2) using the wrench (109)
supplied.
4. Using a pipe wrench on the hex of the intake
cylinder (19), unscrew it from the intake valve
housing (17). The pump may separate at joints A,
B, or C. See Fig. 8.
NOTE: These instructions are written with the pump
separating at joint A. If it separates at joints B or C,
disassemble it at that joint, place the intake housing
(17) in a vise, and continue with step 5.
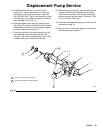
5. Unscrew the intake valve housing (17) from the
cylinder (10). Pull the housing off the pump. The
intake check valve assembly (V, see Fig. 7) should
slide down the priming piston rod (18) as you
remove the housing; if it does not slide easily,
firmly tap on the top of the housing (17) with a
rubber mallet to loosen.
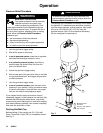
05002
Fig. 7
39
17a, b, c
18
38
37
16
15
N
P
V
DETAIL OF INTAKE CHECK VALVE
04993
Fig. 8
2
9
18
22
21
19
17a, b, c
10
A
B
C
1