


17
18
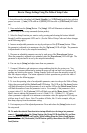
Clover Leaf Pattern
The clover leaf pattern is intended for use when you wish to repeatedly
pass over a point where you think sh may be holding.
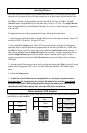
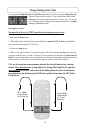
You will need to setup
the special nav function
buttons (above) for
search patterns.
1. Press and hold [Setup] button on handheld.
2. While holding down the [Setup] button, select and light
up [number 8] LED [Clover] on the handheld. (You will
press the button twice.) Release the Setup button.
3. You must mark the location of the clover leaf stem
with a waypoint in your GPS. Once the waypoint is saved,
select “go to” this waypoint on your GPS.
4. From heading hold, press and release the [GPS button]
on the handheld. The pilot will start maneuvering toward
the waypoint.
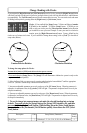
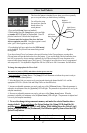
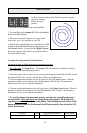
If you have selected Clover Leaf pattern as the special function for the Chevron buttons, pressing either
Chevron button will start the boat on the clover leaf pattern. If you used the Right Chevron button the clover
leaf will be traversed by always turning to starboard, the Left Chevron button will cause the pattern to be
traversed while always turning to port. (See Figure 4) The length of one of the clover leaves is programmed
with setup code 28. It is adjustable in length from 500 ft to 6,000 feet in 100 ft. increments. See table below.
Waypoint
Selected on GPS
Right Chevron
Button Pressed
Left Chevron
Button Pressed
Figure 4
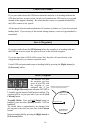
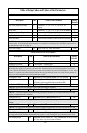
Description Code Setup Options (Parameters) Factory Setting
Clover Leaf Length 28 500 to 6,000 ft by 100ft. Increments 1,000
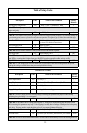
To change the setup options for Clover Leaf:
You must be in [Auto] or [STBY] mode before selection process can start
1. Press and release
the [Setup] Button. The [Setup] LED will illuminate to indicate the system is ready to
take setup commands (button pushes).
2. Select the Setup Code you want to use by pressing and releasing the button labeled 2 & 8 until the
appropriate LED is lit. (See the Code and Setup Choices on the table below).
3. Increase an adjustable parameter one step by each press of the [UP Arrow] button. When the parameter is
adjusted to its maximum value, the [Up Arrow] LED will light. The parameter is adjusted and is in use by the
autopilot immediately.
4. Decrease an adjustable parameter one step by each press of the [Down Arrow] button. When the
parameter is adjusted to its minimum value, the [Down Arrow] LED will light. The parameter is adjusted and
is in use by the autopilot immediately.
5. To save the changes into permanent memory and make the selected function into a
startup default: Press and release
the [Setup] button (the [Setup] LED should be lit),
and then press and hold
the [Select Load] button. While holding down the [Select Load]
button, press and release the [Deckmount] On/Off button quickly, then release the GPS
[Select Load] button.