


9
10
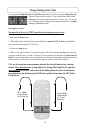
When you select special functions, by the methods described below, you are simply choosing
which function is to be executed by the pilot when you push one of the three special function
buttons.
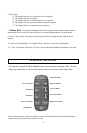
The Plus button is programmable to provide either MOB, ZigZags, or Rudder. The Left
Chevron button is programmable to provide either Steps, Circles, or U Turns. The Right
Chevron button is programmable to provide Waypoint Orbiting, Clover Leaf, or Search steering
in conjunction with your GPS.
To change the functions of these programmable buttons, follow the directions below.
1. Autopilot must be in Heading Hold or Standby Mode before selection process can start.
(AUTO LED solid on or STBY LED solid on. No other LED's on.)
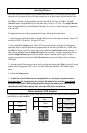
2. Press and hold
the Setup button. Three LED's next to the numbers 1 through 9 will
illuminate, indicating which (3) special functions are programmed to operate. For example, if
LED's 1, 4, and 7 illuminate, your system is programmed to do: 1) MOB when the Plus button is
pressed. 2) Step Turns to port when the Left Chevron button is pressed. 3) Step Turns to
starboard when the Right Chevron button is pressed. 4) Orbit a waypoint clockwise when the
Right Chevron button is pressed and the system is tracking a GPS signal. 5) Orbit a waypoint
counterclockwise when the Left Chevron button is pressed and the system is tracking a GPS
signal.
3. Select the Special Function you want to use by pressing and releasing the Plus and/or
Chevron buttons until the appropriate LED's are lit. See Special Function Indicators LED
Numbers tables below.
4. Release the Setup Button.
If you press and release the Down Arrow button while the autopilot is in heading hold mode,
the heading at the instant the button is pressed becomes the stored heading. Subsequently, while
you are in heading hold (at any heading), pressing and releasing the Up Arrow button will cause
the autopilot to steer to the stored heading.
5. To make the selected Special Functions into start up defaults: Press and release the Setup
button (the setup LED should be lit), then press and hold
the GPS (Select Load) button, verify
that the Load LED is lit, and then press and release the DM button, then release the GPS
(Select Load)button
1 MOB 4 Steps
7
Orbit
2 ZigZag 5 Circles
8
3 Leaf Clover
3 Rudder 6 U Turn
9
Search
SPECIAL FUNCTION INDICATOR LED NUMBERS
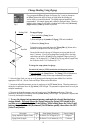
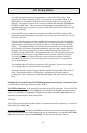
Selecting Patterns
When you select special functions, by the methods described below, you are simply choosing which
function is to be executed by the pilot when you push one of the three special function buttons below.
The [Plus (+) ] button is programmable to provide either MOB, Zig Zags, or Rudder. The [Left
Chevron] button is programmable to provide either Steps, Circles, or U-Turns. The [Right Chevron]
button is programmable to provide Waypoint Orbiting, Clover Leaf, or Search Steering in conjunction
with your GPS.
To change the functions of these programmable buttons, follow the directions below.
1. Autopilot must be in Heading Hold or Standby Mode before selection process can start. (Auto LED
solid on or STBY LED solid on. No other LED’s on.)
2. Press and hold the [Setup] button. Three LED’s next to the numbers 1 through 9 will illuminate,
indicating which (3) special functions are programmed to do, the factory defaults are: 1) MOB when
the [Plus (+)] button is pressed. 2) Step Turns to port when the [Left Chevron] button is pressed. 3)
Step Turns to starboard when the [Right Chevron] button is pressed. 4) Orbit a waypoint clockwise
when the [Right Chevron] button is pressed and the system is tracking a GPS signal. 5) Orbit a
waypoint counterclockwise when the [Left Chevron] button is pressed and the system is tracking a
GPS signal.
3. Select the Special Function you want to use by pressing and releasing the [Plus (+)] and/or Chevron
buttons until the appropriate LED’s are lit. See Special Function Indicators LED Numbers tables
below.
4. Release the [Setup] button.
5. To make the selected Functions into startup defaults
(save the changes into permanent memory)
:
Press and release
the [Setup] button (the [Setup] LED should be lit), and then press and hold
the [Select Load] button. While holding down the [Select Load] button, press and release the
[Deckmount] On/Off button quickly, then release the GPS [Select Load] button.
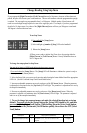
Pattern Indicator LED Numbers
Following the directions above, you will be able to access all of the Special Pattern Functions
listed below on your handheld.
When you select special functions, by the methods described below, you are simply choosing
which function is to be executed by the pilot when you push one of the three special function
buttons.
The Plus button is programmable to provide either MOB, ZigZags, or Rudder. The Left
Chevron button is programmable to provide either Steps, Circles, or U Turns. The Right
Chevron button is programmable to provide Waypoint Orbiting, Clover Leaf, or Search steering
in conjunction with your GPS.
To change the functions of these programmable buttons, follow the directions below.
1. Autopilot must be in Heading Hold or Standby Mode before selection process can start.
(AUTO LED solid on or STBY LED solid on. No other LED's on.)
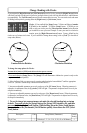
2. Press and hold
the Setup button. Three LED's next to the numbers 1 through 9 will
illuminate, indicating which (3) special functions are programmed to operate. For example, if
LED's 1, 4, and 7 illuminate, your system is programmed to do: 1) MOB when the Plus button is
pressed. 2) Step Turns to port when the Left Chevron button is pressed. 3) Step Turns to
starboard when the Right Chevron button is pressed. 4) Orbit a waypoint clockwise when the
Right Chevron button is pressed and the system is tracking a GPS signal. 5) Orbit a waypoint
counterclockwise when the Left Chevron button is pressed and the system is tracking a GPS
signal
.
3. Select the Special Function you want to use by pressing and releasing the Plus and/or
Chevron buttons until the appropriate LED's are lit. See Special Function Indicators LED
Numbers tables below.
4. Release the Setup Button.
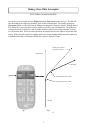
If you press and release the Down Arrow button while the autopilot is in heading hold mode,
the heading at the instant the button is pressed becomes the stored heading. Subsequently, while
you are in heading hold (at any heading), pressing and releasing the Up Arrow button will cause
the autopilot to steer to the stored heading.
5. To make the selected Special Functions into start up defaults: Press and release the Setup
button (the setup LED should be lit), then press and hold
the GPS (Select Load) button, verify
that the Load LED is lit, and then press and release the DM button, then release the GPS
(Select Load)button
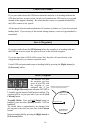
1 MOB 4 Steps
7
Orbit
2 ZigZag 5 Circles
8
3 Leaf Clover
3 Rudder 6 U Turn
9
Search
SPECIAL FUNCTION INDICATOR LED NUMBERS
7 Orbits
8 Clover Leaf
9 Search