


11
12
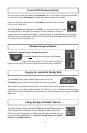
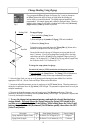
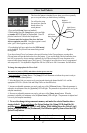
Change Heading Using Zigzags
If you program the [Plus (+)] button for Zigzags (Fig 3) ,and you then press
the [Plus(+)] button the pilot will begin to zigzag about the heading you
were on when you pressed the button. The zigzag angle and period are both
programmable. An example zigzag path is shown in the gure below. When the
system is doing zigzags, it will return to heading hold if either the [Left Arrow],
[Right Arrow] or [Plus(+)] buttons are pressed.
27
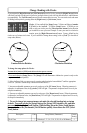
Heading Hold
Boat Path
Change Heading with Zigzags
If you program the Idle/Resume button for Zigzags (other), then when you press the Idle/Resume
button the pilot will begin to zigzag about the heading you were on when you pressed the button. The
zigzag angle and period are both programmable. An example zigzag path is shown in the figure below.
Automatic idle and resume is accomplished by pressing the Idle/Resume button. If the throttle is set
higher than idle, the Idle/ Resume function will take the engine to idle. If the throttle is sitting in the
idle position, the Idle/Resume function will return the throttle to the last "above idle" position. The
Idle/Resume button must be programmed to perform Idle/Resume and not MOB or Zigzags.
Idle/Resume
Increase throttle by pressing the Up Arrow button. Decrease throttle by pressing the Down Arrow
button. The electric throttle runs in parallel with the tiller throttle, this means that you can't reduce
the RPM with the electric throttle if the tiller throttle is set high. It is best to always run with the tiller
throttle set to idle. Be careful to set the electric throttle and tiller throttle to closed position before startin
g
your outboard.
Throttle Up/Down
To engage Zigzags:
1) Press and hold the [Setup] button.
2) Press and light up the [number 2, Zigzag] LED on the handheld.
3) Release the [Setup] Button.
To start the zigzags, press and release the [Zigzag/Plus (+)] button on the
handheld, the autopilot will start the zig-zags.
Factory default sets the zig-zags at 30 degrees per zig-zag and the cycle
time is 3 minutes. If you wish to change those settings refer to the setup
codes below and refer to [Code 8] for the Amplitude (Degree of turn) 10
choices; 5 to 50 degrees by 5’s. [Code 9] The Zig-zag period (Length/Time)
has 20 choices from 1/2 to 10 minutes by 1/2’s.
Fig 3
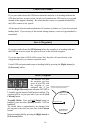
Description
Code Setup Options (Parameters) Factory Settings
Zigzag Amplitude (Degree of turn) 8 10 choices/ 5 to 50 Degrees by 5’s 30 degrees
Zigzag Period (Length) 9 20 choices 1/2 to 10 minutes by 1/2’s 1.5 minutes
To change the setup options for zigzags:
You must be in [Auto] or [STBY] mode before selection process can start
1. Press and release the [Setup] Button. The [Setup] LED will illuminate to
indicate the system is ready to take setup commands (button pushes).
2. Select the Setup Code you want to use by pressing and releasing the button labeled 8 or 9 until the
appropriate LED is lit. (See the Codes and Setup Choices on the table below.
3. Increase an adjustable parameter one step by each press of the [UP Arrow] button. When the parameter is
adjusted to its maximum value, the [Up Arrow] LED will light. The parameter is adjusted and is in use by the
autopilot immediately.
4. Decrease an adjustable parameter one step by each press of the [Down Arrow] button. When the
parameter is adjusted to its minimum value, the [Down Arrow] LED will light. The parameter is adjusted and
is in use by the autopilot immediately.
5. To save the changes into permanent memory and make the selected function into a
startup default: Press and release the [Setup] button (the [Setup] LED should be lit),
and then press and hold the [Select Load] button. While holding down the [Select Load]
button, press and release the [Deckmount] On/Off button quickly, then release the GPS
[Select Load] button.