


14
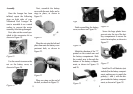
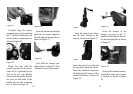
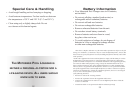
Remove the batteries, as
shown in Figure 41.
Figure 41
Unscrew the hexagon nut on
the top of the control sleeve,
as shown in Figure 42.
Figure 42
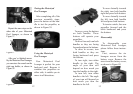
Squeeze the fastener locat-
ed below the hexagon nut to
unfasten the battery com-
partment. Lift it off.
On the underside of the
Motorized Pool Lounger,
squeeze the holes on the
base of the control arm
sleeve, as shown in Figure
43. This will release the fas-
teners holding the control
arm in place.
Figure 43
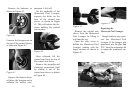
Once released, lift the
control arm from the top of
the control arm sleeve.
Remove the propeller and
electrical connection shaft
by sliding it out of the
control arm sleeve, as shown
in Figure 44.
Figure 44
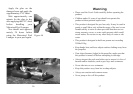
Remove the control arm
sleeve from the Motorized
Pool Lounger by lifting it
out from the top.
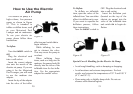
Open the valve cover to
deflate the Motorized Pool
Lounger, starting with the
larger cavities, as shown in
Figure 45.
Figure 45
Repairing the
Motorized Pool Lounger
Rough surfaces may punc-
ture the Motorized Pool
Lounger. If the lounger gets
punctured, use the glue and
PVC from the restoration kit
to repair the punctured sur-
face.
15