


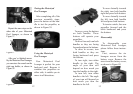


Figure 28
Carefully align the battery
compartment cover by matching
the “3” printed on both the cover
and the battery compartment, as
shown in Figure 29.
Figure 29
Fasten the nuts with the
wrench provided in the acces-
sories kit. It is generally best to
start at the two nuts directly
across from the handle, then the
two nuts on both sides of the
handle, then the last remaining
two, as shown in Figure 30.
Figure 30
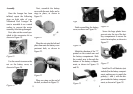
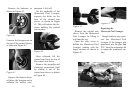
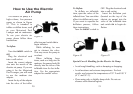
Insert the electrical connection
shaft into the motor subassem-
bly that encloses the propeller, as
shown in Figure 31.
Figure 31
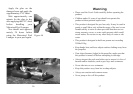
Next, hold the lounger verti-
cally as shown in Figure 32. This
will make it easier to assemble.
Figure 32
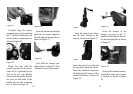
Insert the control arm sleeve
into the holes located on the
armrest, as shown in Figure 33.
Figure 33
Insert the control arm through
the top of the control arm sleeve.
Insert the electrical connection
shaft through the bottom of the
control arm sleeve, as shown in
Figure 34.
Figure 34
From the bottom of the
lounger, you can see the “1”
printed on both sides of the con-
trol arm and propeller, as shown
in Figure 35.
Figure 35
Push up the electrical connec-
tion shaft to make sure it’s tight-
ly secured, as shown in Figure
36.
10 11