


Page 17
KK260 AND KK360
ASSEMBLY INSTRUCTIONS
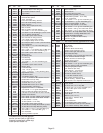
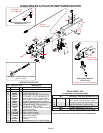
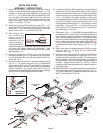
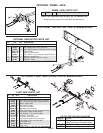
1. Place the main frame on blocks or some other sturdy
support so that the frame rests approximately 8" - 10" off
the ground. Attach the tilt bed ramps (#1) as shown using
four 1/2" x 1-1/4" grade 5 bolts (#4), flat washer (#5) and
lock nuts (#6), two on each side of each ramp, and then
three 7/16" x 1" grade 8 bolts (#2) and lock nuts (#3) on the
top of each ramp. Torque 7/16" bolts to 80 ft. lbs. and
torque 1/2" bolts to 75 ft. lbs.
2. Attach rear tire stop (#7) as shown using two 3/8" x 1-1/4"
grade 5 bolts (#8), flat washers (#9) and lock nuts (#10).
These 3/8" x 1-1/4" bolts will also go through the tilt bed
ramps. Torque 3/8" x 1-1/4" bolts to 35 ft. lbs.
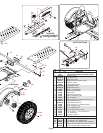
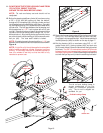
3. Hold tongue up to
front of trailer and
locate the three
bullet connectors
extending out the
back of the tongue
and plug into the con-
nector protruding from under the main frame channel. Do
not cross colors when making this connection. See
drawing above. Make sure the the pigtail for the license
plate bracket is out.
4. Mount the tongue (#11) to the front of the Kar Kaddy
mainframe using a 5/8" x 4-1/2" grade 5 bolt (#12) and lock
nut (#13)(torque to 50 ft. lbs). Do not torque over 50 ft. lbs.
or bed will not tilt.
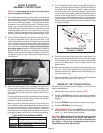
5. Mount the latch handle (#14) to the mounting plate using
the 1/2" x 1-1/4" grade 5 bolt (#15), two 1/2" flatwashers
(#16), bushing (#17), and 1/2" locknut (#18). Put stainless
steel bushing (#19) into latch cable (#20) and secure to
handle using 3/8" x 3/4" grade 5 bolt (#21) and 5/16"
flatwasher (#22). Adjust latch so cable is snug by loosening
bolt and nut and sliding handle forward or back.
24" Chain
36" Chain
Yellow/Brown
Wires
Green/Brown
Wires
Latch Handle
Installation
Connector
1
1
2
3
4
5
6
7
8
11
12
13
14
15
16
17
16
18
19
20
21
22
23
23
9
10
24
26
26
25
24
25
27
28
28
29
30
31
32
33
34
35
36
37
38
39
40
40
42
43
41
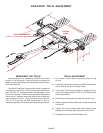
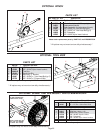
6. Lay the bracing struts (#23) out along the tow dolly tongue
with the back end (the end with the larger hole in it) of the
bracing strut toward the mainframe. Loosely bolt the back
of each bracing strut to the trailer frame as shown using
1/2" x 1-1/2" grade 5 bolt (#24), flatwasher (#25), pivot
bushing (#26) and locknut (#27). Hold up the front end (the
end with the smaller hole) of each bracing strut to the
tongue and secure with two 5/8" x 1-1/4" epoxied hex head
bolts (#28). Torque the 1/2" x 1-1/2" bolt with the pivot
bushing to 75 ft. lbs. Torque the two 5/8" x 1-1/4" epoxied
hex head bolts to 100 ft. lbs.
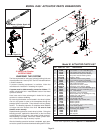
7. Remove the 7/16" x 1-1/4" bolt (#29), flat washer (#30), and
lock washer (#31) from the front of each wheel platform tire
stop. Slide the tie-down winches into the channel at the
front of the wheel platforms as shown. The ratchet handles
are to the outside of each winch and ratchet springs are to
the top. Attach two towed vehicle safety chains (#32, 36"
long). Secure one chain to each wheel platform tire stop
and replace flat washer, lock washer and 7/16" x 1-1/4"
bolt.
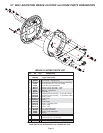
8. Attach each hub and spindle assembly (#33) as shown
using four 7/16" x 1-1/4" grade 8 epoxied bolts (#34).
(Torque to 80 ft. lbs.)
9. Secure the hitch coupler (#35) and the lift handle (#36) to
the front end of the tongue (#11) with two 1/2" x 4-1/2"
grade 5 bolts (#37) and lock nuts (#38). The white ground
wire is attached under the head of the rear bolt attaching
the hitch coupler. (It is very important that a good ground
is made). Torque the lock nuts to 75 - 80 ft. lbs. Tap the
rubber grip (#39) onto the handle with a rubber hammer or
a wooden mallet.
10. Attach the two 24" long transport safety chains (#40) to the
two holes located in the tongue rest using two 7/16" x 1-
1/4" grade 5 bolts (#41), flat washers (#42) and lock nuts
(#43). Torque bolts to 50 ft. lbs.
Pigtail
Brown/Green
Brown/Yellow
Yellow
Green
Brown