


6
related equipment (headlights, tail lights, air bag, etc.) that you can
tap into with an in-line splice. Possible candidate wires include
those from the cigarette lighter, dome light, glove compartment
light, clock, tail gate light, or other convenience functions.
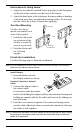
2. Tap a red wire from the fuse holder to the unswitched +12 VDC
source you located. Use either an in-line splice (included) or use a
fuse tap connector (not included) appropriate for your vehicle.
CAUTION: Do not install the fuse into the fuse holder until instructed to do so.
.
3. Locate or make a vehicle chassis ground connection for the harness
cable. You can make one by inserting a spade terminal under the
head of a screw threaded into the vehicle chassis. Be sure to test the
connection with a multimeter before connecting the ground wire.
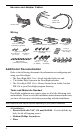
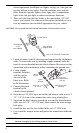
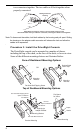
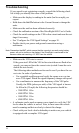
4. Crimp a spade
terminal, included
with the unit to
one end of the
black wire. Refer
to the illustration.
5. Connect the spade
terminal to the
vehicle chassis ground.
6. Strip the red +12 VDC tap wire and the red harness cable wire to 3/
16”- 1/4” (5-6 mm), then connect the wires using a butt splice.
7. Strip both the black chassis ground tap wire and the black harness
cable wire to 3/16”- 1/4” (5-6 mm), then connect the wires using a
butt splice.
8. Install the fuse into the fuse holder in the red +12 VDC wire.
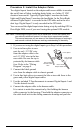
9. Use a small tie wrap to secure and protect the connections under the
dash.
CAUTION: If the connections are on the driver’s side, make sure the wires can not
become entangled in the vehicle pedals or driver’s feet.
In-Line Splice
Unswitched
+12V
from Vehicle
Trim off flush
stripped wire
Red +12V Wire with Fuseholde
r
Crimp Tool,
22-18 AWG Position
(red dot)
Vehicle
Ground
Spade
Terminal
Black Ground Wire
(22 AWG)
Strip 3/16 - 1/4"
(5 - 6 mm)