


Option B: Use Wiring Harness
Package 12150250. Obtain from
GM Service Parts through the
GM Dealership
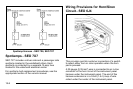
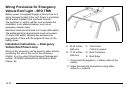
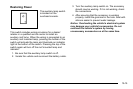
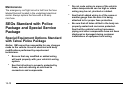
1. Drill a 1.25 inch (32 mm) hole in the outer roof
panel in the area shown in the illustration. The hole
should only go through the outer panel. Remove all
sharp edges from the drilled hole.
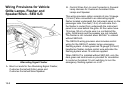
2. Remove the inside overhead console access
panel/lamp lenses.
3. The accessory harness is coil tied to the
passenger's side of the vehicle at the console
inner bracket.
4. Cut the tape holding the harness coil.
5. As one person watches the roof hole from the
outside for the end of the harness, a second
person from the inside of the vehicle should snake
the harness toward the hole.
6. Pull out the wiring harness being careful to avoid
scraping the insulation on the edge of the hole.
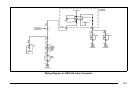
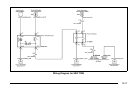
7. Cut the wire to length. Install terminals to wire ends
and insert into the connector. The dark green wire
goes to cavity A and the black wire in cavity B.
Push in the secondary lock to retain the wires.
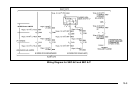
8. Attach the harness assembly from the package to
the accessory. Cover with the supplied conduit for
added protection. Connect the orange wire to the
accessory hot terminal and the black wire to the
ground.
9. Complete the connection from the roof harness to
the extension harness. Cover the mated connector
with the supplied foam. Push the foam covered
connection and excess wire through the roof
panel hole.
10. Reinstall the overhead console access panel/lamp
lenses.
15-14