


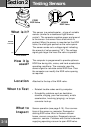


2-22
Testing Sensors
Section
2
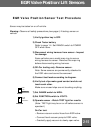
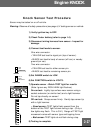
On-Car Test
Important: Reliable testing of the oxygen sensor while on-vehicle is very
difficult because test conditions cannot be well controlled. If the sensor
responds during on-car testing, then it is probably good and no other
testing is necessary. If the sensor does not seem to respond when tested
on-car, remove it and perform the off-car test before deciding whether or
not the sensor is bad.
Warning: This test involves running the engine. Observe all safety precautions
(see page ii). Work in well-ventilated area.
1) Verify ignition key is OFF.
2) Check Tester battery
Refer to page 1-4. Set RANGE switch to POWER OFF
when done.
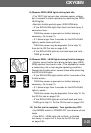
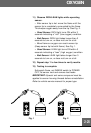
3) Connect test leads.
• YELLOW to sensor SIGNAL circuit.
• BLACK to good vehicle GROUND.
– Keep sensor connected to vehicle wiring and use
backprobe adapter to contact sensor SIGNAL circuit if
possible.
– If you cannot use backprobe, disconnect sensor
connector and connect YELLOW test lead directly to
sensor SIGNAL pin. Note: Most computer systems will
store a trouble code in memory (and turn on the “Check
Engine” light) if engine is run with sensor disconnected.
Ignore or erase the code after testing. Refer to Vehicle
Service Manual.
4) Verify test clips make good contact.
Make sure unused clips are not touching anything.
5) Set RANGE switch to LOW.
6) Set FUNCTION switch to VOLTS.
7) Start engine - Idle until hot.
Run engine until upper radiator hose is hot and
pressurized.
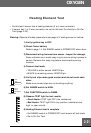
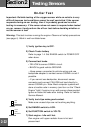
RANGE
HIGH
LOW
POWER OFF
FUNCTION
VOLTS
OHMS
FREQUENCY