9760-Graphic User Interface Manual
40
4.5.1 Arming Alarms
A list of the logical alarm numbers should be available from your manager or security supervisor.
To arm an alarm:
1. Click on the Arm Alarm icon, the Alarm Arming window (illustrated in Figure 4-4) will appear.
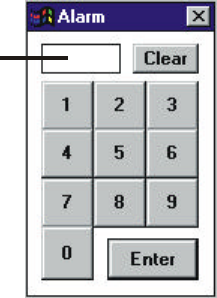
2. Click Alarm No. The Select window (illustrated in Figure 4-11) will appear.
Figure 4-11: Select Window.
3. Position the mouse cursor over the digits in the Select window and click the left mouse button to
enter the digits corresponding to the logical number of the required alarm. If an incorrect number
is selected, click Clear and repeat Step 3.
4. When the correct number appears in the number display click Enter.
5. The logical alarm number will appear in the Current Alarm box if the number was valid.
⇒ A warning beep will sound and Error: Alarm Denied will appear in the System Error box if
access to the alarm has been restricted from that operator.
⇒ A warning beep will sound and Error: Alarm Not Present will appear in the System Error
box if the alarm has not been programmed into the system.
6. If Armed appears in the Status window, the alarm has already been armed, go to Step 7.
If Disarmed appears in the Status window click Arm. Armed will appear in the Status box.
7. To arm more alarms repeat Steps 2 to 6.
8. When all required alarms have been armed, click Close to close the Alarm Arming window.
4.5.2 Disarming Alarms
To disarm an alarm:
1. Click on the Arm Alarm icon, the Alarm Arming window (illustrated in figure 4-4) will appear.
2. (a) To disarm a specific alarm:
(i) Click Alarm No. The Select window (illustrated in Figure 4-11) will appear.
(ii) Position the mouse cursor over the digits in the Select window and click the left mouse
button to enter the digits corresponding to the logical number of the required alarm. If an
incorrect number is selected, click Clear and repeat Step 2(a)(ii).
(iii) When the correct number appears in the number display click Enter.
Number display
