1.4.3.2 Changing the Default Settings
To change the printer’s default settings:
1.
Hold down the Economy/Condensed button and turn on the printer. The printer prints a sheet
that shows the firmware version and describes how to select the language used to print messages.
2.
Press the Font button until the appropriate font LED is selected. The following table shows which
language corresponds to which font LED.
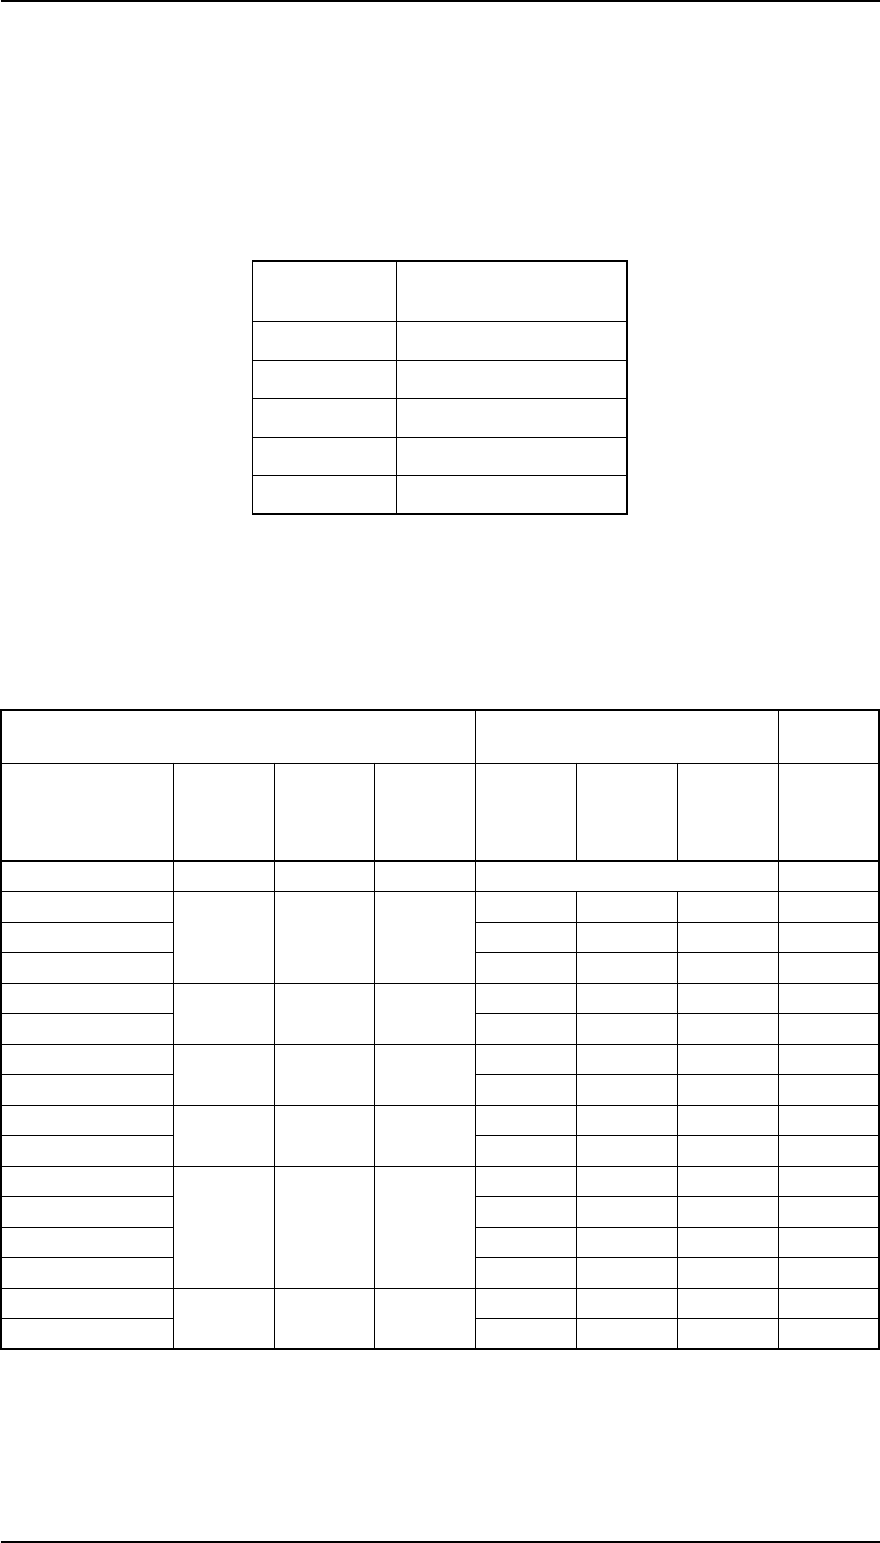
Table 1-16. Language Selection
Language
Font LED
English
Courier
Français
Roman T (PS)
Deutsch
Sans Serif H (PS)
Italiana
Roman
Español
Sans Serif
3.
Press the Alt button. The printer prints the current settings using the selected language. It also prints a
table showing how to change the printer settings.
4.
Press the Font button to advance through the setting menu. The current printer settings are indicated
by the Courier, Roman T (PS), and San Serif H (PS) LEDs. Each time you press the Font button, you
adance to the next setting, and the three font LEDs change according to the selection.
Table 1-17. Feature Selection
Menu
Setting Value
+
Feature/Menu
Courier
LED
Roman T
(PS) LED
Sans
Serif H
(PS) LED
Setting
Operate
LED
Data
LED
Paper Out
LED
Character table
On On On See Table 1-18 +
Print direction
On Off Off
Auto On Off Off
^
Bi-D Off On Off
^
Uni-D On On Off
Network I/F mode
Off On Off
Off Off Off Off
^
On On Off Off
Auto line feed
On On Off
Off Off Off Off
^
On On Off Off
Loading position
Off Off On
3 mm Off Off Off
^
8.5 mm On Off Off
Interface mode
On Off On
Auto On Off Off
^
Parallel Off On Off
^
Serial On On Off
^
Option Off Off On
Auto I/F wait time
Off On On
10 sec. Off Off Off
^
30 sec. On Off Off
5.
Change the setting value by pressing Alt button. Pressing the Alt button changes the setting for the
current menu. The status of the LEDs will be changed as the button is pressed.
Product Description Stylus Pro XL
1-16 Rev.A


