


PERIODIC MAINTENANCE AND ADJUSTMENT
7-38
7
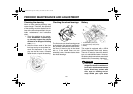
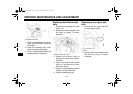
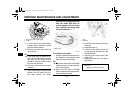
5. Turn the drive chain slack adjust-
ing bolts fully in direction (a) and
push the wheel forward.
6. Remove the drive chain from the
rear sprocket.
TIP
● If the drive chain is difficult to re-
move, remove the wheel axle first,
and then lift the wheel upward
enough to remove the drive chain
from the rear sprocket.
● The drive chain cannot be disas-
sembled.
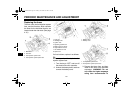
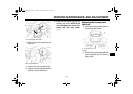
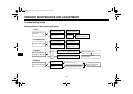
7. While supporting the brake caliper
bracket, pull the wheel axle out,
and then remove the wheel.
NOTICE: Do not apply the brake
after the wheel has been re-
moved together with the brake
disc, otherwise the brake pads
will be forced shut.
[ECA11071]
EAU39412
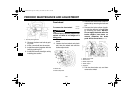
To install the rear wheel
1. Install the wheel and the brake cal-
iper bracket by inserting the wheel
axle from the left-hand side.
TIP
● Make sure that the slot in the brake
caliper bracket is fit over the retain-
er on the swingarm.
● Make sure that there is enough
space between the brake pads be-
fore installing the wheel.
2. Install the drive chain onto the rear
sprocket.
3. Install the axle nut.
4. Lower the rear wheel so that it is
on the ground, and then put the
sidestand down.
5. Adjust the drive chain slack. (See
page 7-25.)
6. Tighten the axle nut to the speci-
fied torque.
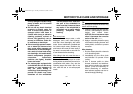
1. Drive chain slack adjusting bolt
2. Locknut
(a)
1
2
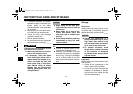
1. Wheel axle
1. Slot
2. Retainer
Tightening torque:
Axle nut:
150 Nm (15 m·kgf, 108 ft·lbf)
U1CA10E0.book Page 38 Tuesday, November 24, 2009 1:41 PM