


16
p/n: 605-00-003-A
2001 FOX Racing Shox, Inc., FOX Forx Owner’s Manual. The information herein is provided as a guide.
FOX Racing Shox reserves the right to change all or part without notice.
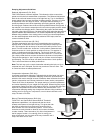
Changing Oil con’t
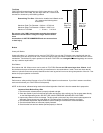
Step 4 - Carefully pull the damper from the fork. It will still contain oil.
Step 5 - Place the damper upright in a deep bucket and carefully cycle the shaft up and down several times to pump out
the remaining oil. Gently shake the damper to check whether it is empty.
Step 6 - When the damper is empty, pull it to its maximum length and install it into the fork. Install the crush washer and
bottom nut and torque to 50 in-lbs.
Step 7 - Measure 160cc of fresh FOX Suspension Fluid and pour it into the right fork leg. Add it slowly to avoid
overflowing and spillage.
Step 8 - Push down on the damper topcap and thread it carefully into the upper tube. Torque to 165 in-lbs.
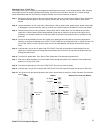
Step 9 - Step 9a -Re-install adjuster knobs. On RLC models, install the low speed compression knob so that the
groove on the bottom is positioned over the aluminum pin in the topcap.
Step 9b -On RL and RLC models, install the lockout lever onto the hex and rotate clockwise until it stops. It
may take multiple rotations to seat the lockout shaft. Orient the lever so the lockout tab faces
approximately the six o’clock position. While pressing the lockout lever down, lightly tighten the
three set screws. Back each screw off 1/4 turn.
Step 9c -On all models, install red rebound knob so that the slot feature on the bottom is aligned with the
flats on the center of the rebound shaft. Apply blue loctite to screw and tighten with 2mm hex
wrench while holding red rebound knob from spinning.
Warning - Damper internals will be damaged if the rebound knob is not held turning while the
screw is tightened.
Step 10 - Cycle the fork several times and run the adjusters through their full ranges of adjustment. You should feel
damper fill with oil after several cycles. Adjust all damper settings to your preferences and head out for a
nice ride.
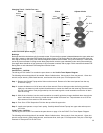
Seals and Foam Rings
FOX FORX feature a sealing system designed to keep your fork moving smoothly in all conditions. There are two parts to the
system - the fork seal and the foam ring. The fork seal features a proprietary scraper lip geometry that keeps dirt out and oil
in the fork. The foam ring sits just below the fork seal. It is saturated with oil and in turn applies oil to the upper tube as it
passes by. This keeps the fork moving up and down smoothly. While FOX FORX are designed to require minimal mainte-
nance, periodic inspection and cleaning of the fork sealing system is recommended.
Step 1 - Around the perimeter of the fork seals are small notches. Use a small flat blade screw driver in these slots
to gently pry the seal from the lower legs of the fork. Once loose, raise them all the way up to the crown on
the upper tubes.
Step 2 - Wrap a clean rag around the junction of the upper tubes and the lower legs. This will keep dirt out while the
seals are being cleaned.
Step 3 - Use a rag to wipe around the outside diameter of the seal. Wipe until clean.
Step 4 - Remove the rags and check the foam rings which will be visible just inside the lower legs. They should be
soaked with oil and should not contain any dirt or debris. If the foam rings are dry, use a few cc’s of FOX
Suspension Fluid to saturate them.
Step 5 - Wipe the upper tubes and slide the seals down into the lower legs. Carefully press the seals into place. A
thin flat bladed screw driver can be used to press in between the upper tube and the fork brace. It is
recommended that the blade of the screw driver be covered with tape or a rag to prevent damage to the seal.
Inspect that seal is firmly seated against top surface of the lower leg.
Step 6 - Wipe off any excess oil and cycle the fork a few times to check for proper operation.