


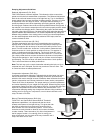
15
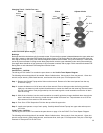
Step 1 - Remove the blue air cap from the top of the left fork leg. Let the air out of the fork. Refer to Pump Instructions
for details about letting the air out with a pump. Remove left top cap with a 26mm socket 6-point socket
wrench.
Step 2 - Loosen the bottom nut 3-4 turns with a 10mm wrench. With a plastic mallet, gently tap the bottom of the shaft
to disengage it from the lower leg. Allow oil to drain into a bucket. Remove the bottom nut and crush washer.
Step 3 - Compress the fork as much as possible. The air piston will be visible about one inch below the top of the
upper tube. Push the bottom of the shaft upwards to push the air piston out of the top of the upper tube. If
necessary, use a small screwdriver to push the bottom of the shaft up through the hole in the bottom of the
lower leg.
Step 4 - Pull the air-shaft assembly from the fork. Clean and dry assembly.
Step 5 - Lubricate the o-ring on the air piston with FOX FLOAT Fluid and re-install the air shaft assembly into the
upper tube. Push the shaft until it approaches the bottom hole of the fork. Do not push the shaft all the way
through the bottom hole.
Step 6 - Turn the fork upside down. Pour 30cc of fresh FOX Suspension Fluid through the bottom hole.
Step 7 - Push the air shaft assembly up until the shaft comes through the bottom hole. Install the crush washer and
bottom nut. Torque to 50 in-lbs.
Step 8 - Turn the fork right side up. Pour 5cc of FOX FLOAT Fluid on top of the air piston.
Step 9 - Lubricate the o-ring on the air topcap with FOX FLOAT Fluid. Re-install the topcap and torque to 165 in-lbs.
Step 10 -Air up the fork to the desired pressure and cycle it several times to check for proper operation. Re-install the
blue air cap.
Changing Oil con’t
FLOAT & Vanilla Forx - Right Side
The right leg of FOX FORX contains the damper. The damper is a precision component that controls the compression and
rebound of your FOX FORX. If your cartridge ever loses oil, be sure to complete these 9 steps to ensure that you have the
proper volume of oil in the damper. Use only FOX Suspension Fluid in your FOX FORX.
NOTE: Too much oil will cause hydraulic lock-out of the fork. This is a serious condition and could lead to loss
of control and serious or fatal injury.
The following tools and supplies will be needed: 26mm 6-sided socket, 10mm wrench, 2mm hex wrench, 1.5mm hex
wrench, torque wrench, plastic faced hammer, small screw driver, drain pan, FOX Suspension Fluid plus a FOX High
Pressure Air Pump and FOX FLOAT Fluid.
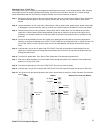
Step 1 - Step 1a -On R models, simply remove the right (damper) side top cap with a 26mm 6-sided socket.
Step 1b -RL and RLC models require that the adjuster knobs be removed as shown on page 14. Remove
the red rebound knob by firmly holding the red knob from turning and loosen screw with a 2mm hex
wrench.
Step 1c -Remove the lock-out lever with a 1.5mm hex wrench by loosening the three set screws and
carefully lifting the lever. Do not remove the set screws. There are 3 balls in the lockout lever. The 3
balls are held in place by grease. Do not lose the three balls in the lock-out lever.
Step 1d -Remove the low-speed compression knob on RLC models. Below the low-speed compression
knob is a detent ball and spring which sit in a counterbore in the topcap. Check that the ball is
positioned in the hole by pressing on it with a small screwdriver and feeling for the force of the
spring.
Step 1e -Loosen and unscrew the damper topcap with a 26mm 6-sided socket.
Step 2 - On RLC models, remove the blue blow-off threshold knob with a 2mm hex key wrench.
Step 3 - Loosen the right side bottom nut with a 10mm wrench or socket 3-4 full turns. Place a clean drain pan under the
right leg and tap lightly with a plastic hammer on the nut to loosen the damper from the lower leg. Unscrew and
remove bottom nut and washer. Push up on the shaft and let the oil drain.