


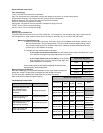

14
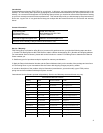
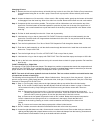
80mm 100mm 125mm
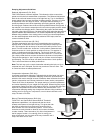
Adjuster Knobs
All Forx
RL, RLC
RLC Only
Travel
Spacers
25mm
20mm
20mm
25mm
20mm
25mm
20mm
25mm
20mm
Preload
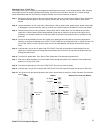
Topcap
Negative
Spring
Guide
Plunger
Shaft
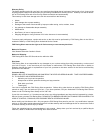
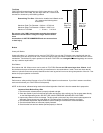
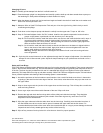
Changing Travel - Vanilla Forx con’t
Vanilla Forx Travel Spacer Diagram
Main
Spring
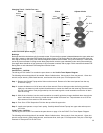
Changing Oil
Vanilla Forks - Left Side
The left leg of FOX Vanilla Forx contain the parts shown on the Vanilla Travel Spacer Diagram.
The following tools and supplies will be needed: 26mm 6-sided socket, 10mm wrench, 2mm hex wrench, 1.5mm hex
wrench, torque wrench, plastic faced hammer, small screw driver, drain pan, FOX Suspension Fluid.
Step 1 - Remove the Preload Topcap with a 26mm socket wrench. Remove all of the travel spacers from the top
of the main spring.
Step 2 - Loosen the bottom nut 3-4 full turns with a 10mm wrench. Place a drain pan under the fork leg and then
lightly tap the bottom nut with a plastic faced hammer to loosen the shaft from the lower leg. Remove bottom
nut and crush washer. Push plunger shaft up into the lower leg with a small screwdriver and let the oil drain
from the fork leg.
Step 3 - With all the oil drained, use the small screwdriver to carefully guide the plunger shaft back down through the
hole in the bottom of the lower leg. Install the crush washer and bottom nut. Torque bottom nut to 50 in-lbs.
Wipe excess oil from exterior of fork with a towel.
Step 4 - Pour 30cc of FOX Suspension Fluid into the top of the left upper tube.
Step 5 - Install travel spacers on top of main spring. Carefully thread Preload Topcap into upper tube and torque to
165 in-lbs.
FLOAT Forks - Left Side
The left leg of FOX FLOAT Forx contains the parts shown on page 12 in the FLOAT Forx Travel Spacer Diagram.
The following tools and supplies will be needed: 26mm 6-sided socket, 10mm wrench, 2mm hex wrench, 1.5mm hex
wrench, torque wrench, plastic faced hammer, small screw driver, drain pan, FOX Suspension Fluid plus a FOX High
Pressure Air Pump and FOX FLOAT Fluid.
Bushings
Bushings should be checked annually for excessive wear. If fore and aft movement is detected between the upper tubes and
lower legs, contact an Authorized FOX Racing Shox Service Center or FOX Racing Shox for further instructions. Grasp the
lower legs at the drop outs (axle). Push the fork straight back towards the rear wheel. Then pull it towards you. There should
not be any free movement or clicking sounds. Next grasp the fork near the upper tube/seal junction and try the same thing.
Once again there should be no free movement. If any movement is noticed, refer to page 4 of this manual and contact FOX
Racing Shox or and Authorized FOX Racing Shox Service Center.