


13
Changing Travel - Vanilla Forx
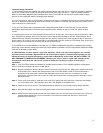
FOX FORX travel can be changed by rearranging the travel spacers as shown in the drawings below. After changing
travel check the fork for proper operation before riding. If there is free movement in the fork or if it makes strange
noises disassemble the fork and check for complete number and correct orientation of spacers.
The following tools and supplies will be needed: 26mm 6-sided socket, 10mm wrench, 2mm hex wrench, 1.5mm hex
wrench, torque wrench, plastic faced hammer, small screw driver, drain pan, FOX Suspension Fluid.
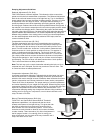
Step 1 - Step 1a -Remove the left (spring side) top cap with a 26mm 6-sided socket.
Step 1b -On R models, simply remove the right (cartridge) side top cap with a 26mm 6-sided socket.
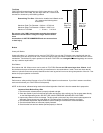
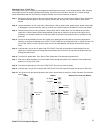
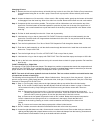
Step 1c -RL and RLC models require that the adjuster knobs be removed as shown in the drawing (see
page 14. Remove the red rebound knob by firmly holding the red knob from turning and loosen
screw with a 2mm hex wrench.
Step 1d -Remove the lock-out lever with a 1.5mm hex wrench by loosening the three set screws and
carefully lifting the lever. Do not remove the set screws. The 3 balls are held in place by grease.
Do not lose the three balls in the lock-out lever.
Step 1e -Remove the low-speed compression knob on RLC models. Below the low-speed compression
knob is a detent ball and spring which sit in a counterbore in the topcap. Check that the ball is
positioned in the hole by pressing on it with a small screwdriver and feeling for the force of the
spring.
Step 1f - Loosen and unscrew the damper topcap with a 26mm 6-sided socket.
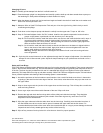
Step 2 - Compress fork slowly until the travel spacers are exposed on the damper side. Pull the damper topcap up
until it stops. Snap on or off the correct length spacers to match the orientation shown in the Travel Spacer
Diagram (see page 14). If removing spacers from the cartridge, make sure to keep them in a safe place for
future use.
Step 3 - Step 3a - Extend the fork by pulling down on the lower leg. Push down on the damper topcap and carefully
thread into upper tube. Torque to 165 in/lbs.
Step 3b -Re-install adjuster knobs. On RLC models, install the low speed compression knob so that the
groove on the bottom is positioned over the aluminum pin in the topcap.
Step 3c -On RL and RLC models, install the lockout lever onto the hex and rotate clockwise until it stops. It
may take multiple rotations to seat the lockout shaft. Orient the lever so the lockout tab faces
approximately the six o’clock position. While pressing the lockout lever down, lightly tighten the
three set screws. Back each screw off 1/4 turn.
Step 3d -On all models, install red rebound knob so that the slot feature on the bottom is aligned with the
flats on the center of the rebound shaft. Apply blue loctite to screw and tighten with 2mm hex
wrench while holding red rebound knob from spinning.
Warning - Damper internals will be damaged if the rebound knob is not held turning while the
screw is tightened.
Step 4 - Loosen the left (spring side) with a 10mm wrench or socket 3-4 full turns. Place a clean drain pan under the left leg
and tap lightly with a plastic hammer on the nut to loosen the plunger from the lower leg. Unscrew and remove
bottom nut and washer. Push up on the shaft and let oil drain.
Step 5 - Make sure all oil is drained from left side leg and right topcap is tight. Turn bike upside down and push out
plunger shaft.
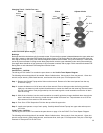
Step 6 - Looking at the Travel Spacer Diagram, add or remove spacers between the black negativespring guide and
the aluminum coil insert. Spacers snap onto the shaft. Slide the black negative spring guide up against the
spacers.
Step 7 - Reinstall the plunger shaft, spring and spacers into the left fork leg and install the crush washer and bottom
nut. Torque the bottom nut to 50 in-lbs.
Step 8 - Pour in 30cc of new FOX Suspension Fluid or re-use oil from clean drain pan into the left upper tube.
Step 9 - Install left top cap and torque to 165 in-lbs.
Step 10 - Cycle the fork several times to check for proper operation before riding. If there is free movement in the fork
or if it makes strange noises, disassemble fork to check for complete number and orientation of spacers.