


17
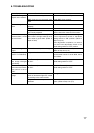
Remedy
Connect the cables correctly.
Solder BNC plugs correctly.
Focus the lens.
Remove dirt on the lens.
Adjust the level correctly in accordance
with the instruction manual of the monitor.
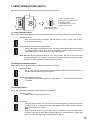
Focus the lens again after turning the
Focus adjustment switch of the Mode
setting switch to “ON” position. (Refer to
Step 6 on p.13.)
After adjustment completion, be sure to
turn the Focus adjustment switch of the
Mode setting switch to “OFF” position.
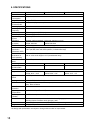
Adjust the Iris control to an optimum level.
(Refer to Step 6 on p.13.)
This camera unit uses a wide lens.
As the screen curves if set to Wide, this is
not a failure.
Turn the Focus adjustment switch of the
Mode setting switch to “OFF.”
Turn the Focus adjustment switch of the
Mode setting switch to “OFF.”
Change the cable route.
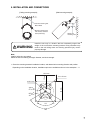
Be sure to attach the supplied insulator
space. (Refer to Step 3 on p. 9)
Symptom
No camera image dis-
played on the monitor.
Camera image is not
clear.
When the subject
becomes dark, it could
be out of focus.
Camera images too
bright
Images curved. (In
case of C-CV454D-3)
The color of the cam-
era image changes
periodically.
The screen flickers
even when the Flicker-
less switch is set to
“ON.”
Noise is added in
image.
Possible Cause
Cables are not correctly connected.
BNC plugs are not correctly sold-
ered.
Camera lens does not focus
properly.
Lens is dirty.
Image black level of the monitor is
not correctly adjusted.
The subject that was brought into
focus when it is bright could be out of
focus when it grows dark. (Effect of
depth of field)
Pre-set iris control position changed.
Angle of view is set to Wide.
The Focus adjustment switch is set
to “ON.”
The Focus adjustment switch is set
to “ON.”
Cables of other electric appliances
such as fluorescent lights are routed
in proximity to the camera cable.
Supplied insulator spacer is not
attached.
8. TROUBLESHOOTING