


USSC Page 13
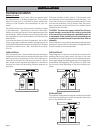
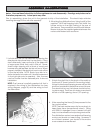
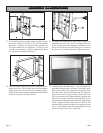
13. Installing front and rear cast baffles, heat plates.
NOTE: Grate frames and brick will slide forward
and backward to allow baffle to fit. Install front
cast baffle using two (2) 5/16 bolts, nuts & wash-
ers (7/16 wrench will be needed). Place the side
of the baffle that has the two ribs against the front
weld of the firebox. Do not tighten bolts yet.
Place the rear cast baffle to the back of the fire-
box but do not attach the bolts at this time.
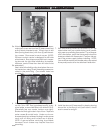
14. Now slip the rear heat plate in behind the rear
baffle. Attach heat plate to the firebox by using
two (2) 5/16 bolts, nuts & washers. First, line up
the top holes and tighten bolts. Secondly, line
up the holes in the rear baffle and the heat plate
with the firebox and attach by using two (2) 5/16
bolts, nuts & washers. Tighten all four (4) bolts.
NOTE: to reach rear bolts you may find it easier to
put your arm through the flue outlet rather than
to reach through the feed door.
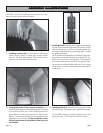
15. Installing smoke damper rod to sliding smoke
damper. First, insert rod through hole above feed
door and push forward.
16. Next working through the flue hole behind fur-
nace, line up rod between the two posts on the
sliding smoke damper. Then line up the three (3)
holes for cotter pin insertion, this procedure will
test your patience. It's helpful to have a flashlight
and another person positioning the rod.
ASSEMBLASSEMBL
ASSEMBLASSEMBL
ASSEMBL
Y ILLY ILL
Y ILLY ILL
Y ILL
USTRAUSTRA
USTRAUSTRA
USTRA
TIONSTIONS
TIONSTIONS
TIONS