


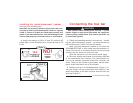


Installing the
‘quick-disconnect’ system
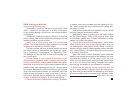
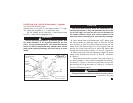
A
safety
plate
quick-
disconnect
base
vehicle
mounting
bracket
vehicle
mounting
bracket
safety
plate
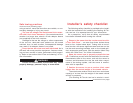
Quick-disconnect parts list
(2) quick-disconnects
(parts A & B)
(2) cable anchors (E & F)
(2) safety plates (C)
All mounting hardware
Figure 1
vertical
pin
cable
anchor
cable
anchor
passenger side
quick-disconnect
vertical
pin
E
C
C
B
F
driver side
quick-disconnect
6
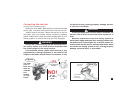
1. First, attach the quick-disconnects (“QDs,” parts “A”
and “B” in Figure 1) to the tow bar mounting brackets. At-
tach the QDs so that the vertical pin on each is pointing
up, as shown in Figure 1.
Attach part “A” on the passenger side, and part “B”
on the driver side. Use the supplied ½" x 1½" bolts, the
two safety plates (parts “C”), flat washers, lock washers
and nuts, as shown in Figure 1.
Both QDs have cable anchors — parts “E” and “F” in
Figure 1 — designed for safety cable attachment. Bolt
continued on next page
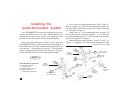
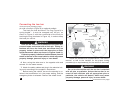
quick-
disconnect
base
quick-
disconnect
crossbar
Your ROADMASTER tow bar is equipped with an ex-
clusive “quick-disconnect” (or, “QD”) system. Before con-
necting the tow bar to the vehicle, first install the com-
ponents of the QD system to the mounting bracket.
Note: the quick-disconnect system is not used with
ROADMASTER ‘MS’ or ‘MX’ series mounting brackets. If
the towed vehicle has MS or MX brackets, proceed to the
next section — “Connecting the tow bar.” The quick-dis-
connect system should be reserved, however, for subse-
quent vehicles which may not have these brackets.