


12
Heading Sensor Owner’s Handbook
To ensure that the compass has received accurate data, perform the
following procedure:
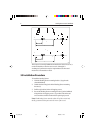
1. Choose a calm day, and select an area of open water. Ideally, the
current and tide effects should be at a minimum.
2. Calculate the size of circle you need to make in order to keep your
turn rate down to not less than 45 seconds for each 90° of turn.
You can turn more slowly than this, and you do not need to keep to
an exact circle, but if you turn too quickly the deviation data will be
ignored.
3. Turn your vessel continuously through two full circles (720°), at a
slow, steady speed, keeping the vessel level. You can go either
clockwise or anti-clockwise.
4. Ideally, continue to turn through a further two full circles to ensure
you have obtained accurate data.
The Heading Sensor will now correct all heading readings using the
variation data obtained.
4.3 Heading Alignment
After you have performed the Continuous Deviation Correction
procedure, you should check the heading alignment. You can do so
using one or both of the following techniques:
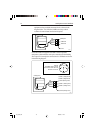
• Compare the heading information on your display instrument (such
as a XX Radar or RayData) with the ship’s magnetic compass for
several headings.
Note: Your magnetic compass must be accurate, and should have
been calibrated recently.
• Choose reference points from a chart, and navigate between them.
Then compare the readings from your Heading Sensor with the
actual chart courses.
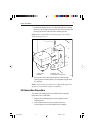
If the Heading Sensor’s readings differ from the actual readings by a
constant amount, you need to correct the heading alignment. This is
achieved by adjusting the position of the compass, as follows:
1. Loosen the Heading Sensor mounting slightly, so that you can
rotate the sensor. To do this, use the Allen key supplied with the
Heading Sensor to loosen the Allen bolt in the top of the Heading
Sensor mounting bracket (see page 7).
124_3c04.p65 09/05/01, 11:3012