


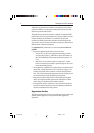


9
Chapter 3: Installation
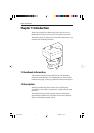
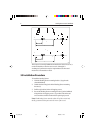
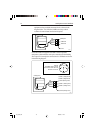
5. Assemble the Heading Sensor (1) to the Heading Sensor mounting
bracket (4). The shaft protruding from the base of the unit must click
positively into the slot in the base of the mounting bracket.
Note: The boat symbol embossed on the top of the active compass
should be facing forwards.
D5506-1
1
2
3
4
1 Heading Sensor
2 Allen bolt
3 Self-tapping screw
4 Heading Sensor mounting bracket
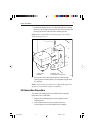
6. Pass the Allen bolt (2) through the aperture in the top of the
Heading Sensor mounting bracket (4) and tighten using the Allen
key supplied.
Note: You may need to loosen this later to adjust the Heading Sensor
alignment , as described in Chapter 4, Calibration.
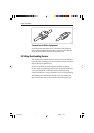
3.4 Connection Procedure
To connect your Heading Sensor to an NMEA 0183 compatible
instrument, such as a XX Radar:
1. Plug the 6ft (2m) Heading Sensor cable (supplied) into the
Heading Sensor.
2. Connect the black and red wires from the cable to the
corresponding wires from the NMEA 0183 compatible
124_3c03.p65 09/05/01, 11:309