


Section III-F Continued: Interchanging Fixed Width Slit Plates in the
Model 715 Fixed Slit Assemblies:
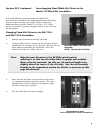
If your SP-500i was purchased with the Model 715
type fixed slit assemblies, the following procedure should be
used in order to change slit widths. First, at least one
additional fixed slit plate, Model 715-4-XX or 715-14-XX,
must be available to permit changing widths in the 715 type
slit assemblies.
Changing Fixed Slit Plates in the 500-715-1
and 500-715-2 Assemblies:
1. Remove any accessories from the slit body.
2. Using an allen wrench, loosen the two slit plate screws
which hold the slit plate to the slit body. Remove the slit
plate without contacting the slit blades. Store the
removed slit plate in a clean, dry area.
3. Place the new slit plate in the slit body and secure
it in position using the slit plate screws. The cone
shaped holes in the slit plate are designed to align
the slits to the optical system.
4. The slit width has now been changed.
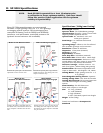
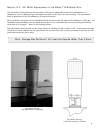
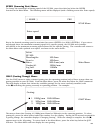
Fixed Width Slit Plate
Note Orientation for Correct Installation
9
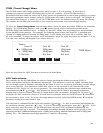
Note: Align the new slit plate to the SP-500i optical axis by
orienting it so that the slit width label is upright and readable.
When correctly mounted, the slits are off-centered height-wise,
slightly above the center of the slit body. See the slit assembly
drawing in the appendices section for details, or pictures on this
page for reference.
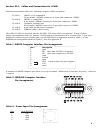
Standard Model 715 Fixed Slit
Assembly
NOTE: Optical Axis Position