


Rev. K, p. 7 of 11
8. ROOF & CONSOLE ASS’Y. (cont.)
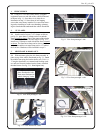
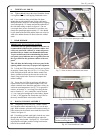
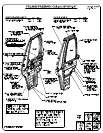
8.3 A driver’s side wiper is provided. Place the
driver’s side wiper wire below the front tubular frame as
shown in fig. 8.3. If installing an optional passenger’s
side wiper, place that wire below the front tubular frame
as well. If not installing a passenger’s side wiper, push
the passenger’s side wiring up into the console to hide it.
Caution: If installing a second wiper, double check that
both wipers have a maximum 85 degree sweep to avoid
interference. The motor should have a sticker on it indi-
cating the degree of sweep.
8.4 If not installing optional work lights, install four
1/4-20 x 3/4” long Truss head, Phillips head bolts into
factory installed threaded inserts in the front of the over-
head console. Leave bolts loose. Note: two per side
where the work light mounting bracket would be
mounted. See figure 8.2 on the previous page.
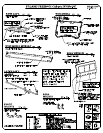
8.5 OPTIONAL: If installing the optional work lights
(kit p/n 2876382), discard the two brackets with the 3-
hole pattern on the light and use the supplied bracket
with the 4-hole pattern. See fig. 8.5. Install work light
brackets oriented as shown in figure 8.5.1. Use four 1/4-
20 x 3/4” long Truss head, Phillips head bolts into fac-
tory installed threaded inserts in the front of the overhead
console. Leave bolts loose.
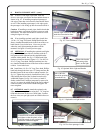
8.6 Install three 1/4-20 x 3/4” long Truss head, Phillips
head bolts through the three rear “P” clamps and into the
threaded inserts in the rear of the overhead console. See
fig. 8.6. Tighten the previously installed four bolts (2 per
side) holding the front of the overhead console to the
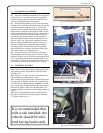
windshield support. Per fig. 8.6.1 below, re-install 2
fender washers and 2 locknuts (temporarily removed in
step 8.1) to secure the middle front of the roof/overhead
console assembly to the metal windshield support. Do
not overtighten.
8.7 OPTIONAL cont’d.: Attach the optional work
lights to the mounting brackets using the 1 7/8” long hex
head bolts that came on the set of work lights. Connect
the four wires (two per light) (male to female bullet con-
nectors).
Fig. 8.5 Optional Work Light and Bracket
discard the bracket
and carriage bolt
that is on the light
Fig. 8.5.1 Optional work light bracket
tabs with holes
should be pointing
towards the sky
Fig. 8.3 View from driver’s side
loomed wiper wires to be under-
neath the front tubular frame
Fig. 8.6 View from passenger’s side
factory installed
threaded insert
Fig. 8.6.1 View from front of vehicle
re-install fender washers and locknuts
and tighten so that the plastic of the
overhead console is snug against the
sheetmetal windshield support