


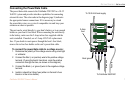


GETTING STARTED > INSTALLATION
Fishfinder 250/250C Owner’s Manual 7
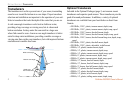
Connecting the Power/Data Cable
The power/data cable connects the Fishfinder 250/250C to a 10-35
Volt DC system and provides interface capabilities for connecting
external devices. The color code in the diagram (page 9) indicates
the appropriate harness connections. If it is necessary to extend
the power/data wires, use a wire of comparable size and keep your
extension as short as possible.
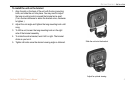
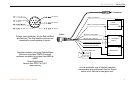
The unit can be wired directly to your boat’s battery or to an unused
holder on your boat’s fuse block. When connecting the unit directly
to the battery, make sure the 2-Amp in-line fuse supplied with the
unit is installed. If needed, use a 2-Amp ACG/3AG replacement
fuse. If you decide to route power through the boat’s fuse block,
remove the in-line fuse holder on the unit’s power/data cable.
To connect the power/data cable to a voltage source:
1. Determine the polarity of the voltage source using a test light
or voltmeter.
2. Connect the Red (+ or positive) wire to the positive voltage
terminal. (If using the boat’s fuse block, route the positive
connection through the fuse, as shown on the diagram.)
3. Connect the Black (- or ground) wire to the negative voltage
terminal.
4. Install or check the 2-Amp fuse (either on the boat’s fuse
block or in the in-line holder).
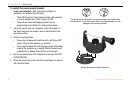
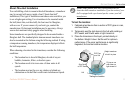
To 10-35 Volt boat supply
2A
-
+
Boat ground
2-Amp
fuse
To Fishfinder 250/250C
Black wire
Red wire