


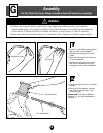
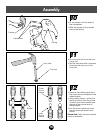

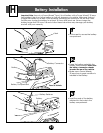


Assembly
• Position the vehicle upright.
• Apply headlight labels to the
fairing as shown.
• Make sure the areas where the
labels will be applied are clean
and dry.
• For best adhesion, avoid applying
labels more than once.
19
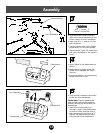
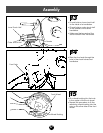
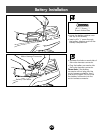
L
• Align the “L” on the left headlight
lens with the “L” in the left head-
light on the fairing.
• Insert the tabs on the headlight
lens into the slots in the fairing.
• Press firmly to snap the headlight
lens into the fairing.
• Repeat this procedure to
assemble the right headlight lens
(marked “R”) to the fairing.
20
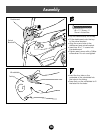
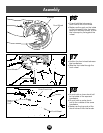
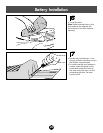
• Slide the front axle through the
handlebar.
• Fit the remaining cap nut on the
end of the front axle.
• Support the front axle and tap the
cap nut with a hammer to secure
it on the end of the front axle.
21
19
“L”
Cap Nut
Front Axle
Handlebar