


Service
12 306674V
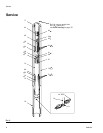
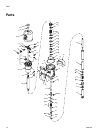
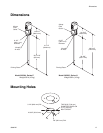
2. Remove the cotter pin (60) and unscrew the pump
connecting rod (79) from the air motor piston rod
(52). Remove the cylinder (32) from the air motor
base (56) as described under Disassembly on page
10.
3. Remove one louvered air exhaust plate (36) and
unscrew the throat packing nut (45), using a span-
ner wrench or a 0.22 in (5.6 mm) diameter rod.
4. Remove the packing nut (45), male and female
glands (47, 48), v-packings (49), washer (44), bear-
ing (46), retainer (24), wiper (22), o-ring (23), u-cup
(25), and washer (26) from the base.
5. Clean the throat packing area in the base and the
packing nut. Clean and inspect all parts and replace
as necessary.
6. Lubricate the packings, piston rod, and piston flange
with a light, waterproof grease.
7. Install the washer (26) into the base. Assemble the
packing (25) and the wiper (22) into the retainer
(24). Install the o-ring (23) onto the retainer, and
insert the retainer assembly into the base.
NOTE: Make sure the packing (25) lips face down and
make sure the wiper (22) lips face up.
8. Insert the bearing (46) and the washer (44) into the
base. Assemble the female gland (48), v-packings
(49), and the male gland (47) into the packing nut
(45).
9. Reinstall the spacer and packing in the base and
packing nut (45). Screw the packing nut into the
base and tighten it securely. Carefully slide the pis-
ton rod (52) down through the throat packing and
lower the piston into the base. Reinstall the plate
(36) and cylinder (32). Reassemble the air motor to
the displacement pump.
10. Torque the outlet adapter (42) to 45 to 55 ft-lb (61 to
75 N.m).
NOTE: When reinstalling the cotter pin (60), always
spread and flatten the pin (both the head and prongs)
around the rod to within 1 inch (25 mm) total diameter.
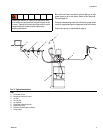
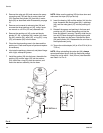
see Detail A of F
IG. 6.
FIG. 6
45
36
80
56
32
SEE DETAIL A
52
60
79
1 in.
(25 mm)
DETAIL A