


14
Getting Started
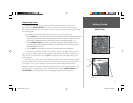
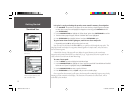
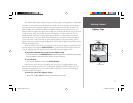
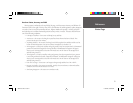
Sonar Page
The Sonar Page lets you use the GPSMAP 168 Sounder as a fi shfi nder. The top of the screen
contains any of 27 selectable data fi eld options, while the middle of the page contains a right-to-left
moving sonar image of the water beneath your boat. (Note: Items appear on the screen as they pass
under your transducer. Those objects appearing on the right side of the screen are closer to you
than those on the left.) Fish are displayed as a darkened arch or a fi sh icon in three different sizes.
Thermoclines (layers of water separating warmer water above from cooler water below) are shown
as shades of gray.
The area of strongest sonar return (or whiteline) is displayed as solid gray. Typically, the bottom
will be the primary source of the whiteline. A thin whiteline indicates a softer bottom while a thick
whiteline shows a harder bottom. A black line is used to show the point where water meets the
whiteline. This black line will follow the bottom contour, along with any signifi cant objects lying on
the bottom. Along the right side of the screen is an adjustable scale which refl ects the depth of the
area being displayed. If the unit does not detect a transducer attached to the unit, a “Sonar Turned
Off” message will appear across the top of the Sonar Page. More on the Sonar Page may be found
on pages 38-44.
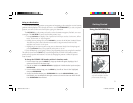
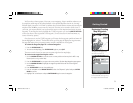
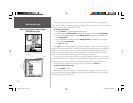
The GPSMAP 168 Sounder uses two range modes: auto and manual. Auto mode displays the
most information possible while continuously showing the bottom. Manual mode lets you select the
displayed depth. These and other Sonar Page functions are controlled from the adjustment bar.
To switch from auto to manual mode:
1. With the ‘Range’ fi eld highlighted, press the ARROW KEYPAD UP or DOWN until the desired
depth range is displayed on the adjustment bar or shows on the depth scale in the lower right
side of the page.
2. Press ENTER/MARK or press LEFT or RIGHT on the ARROW KEYPAD to confi rm the selected
range.
To switch from manual to auto mode:
1. With the ‘Range’ fi eld highlighted, press the ARROW KEYPAD UP or DOWN until the selection
arrow points to ‘Auto’ or ‘Auto’ is displayed on the adjustment bar.
2. Press ENTER/MARK or press LEFT or RIGHT on the ARROW KEYPAD.
Depth Range Adjustment
Current
Setting
Sonar Page
Data Fields
Depth
Line
Depth
Scale
Flasher
Adjustment
Bar
Fish Arch
Bottom
Whiteline
Thermocline
168 Manual Part 1.indd 14 11/18/2002, 3:36:26 PM