


98
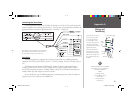
Appendix G
Mounting the Transducer
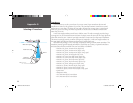
To avoid drilling a hole to mount a thru-hull transducer, a transom mount transducer may be used
with epoxy inside a boat (“shoot-thru-hull” installation). For a transducer to be mounted inside the hull
(shoot-thru, not thru-hull), the boat must be fi berglass, no core (contact your boat manufacturer if you
are unsure). Test by placing a small amount of water inside the hull, placing the transducer on top of
the water, then verifying the accuracy of the locators versus the current water depth. If they are the
same, use epoxy (non-silicone based) to affi x the transducer to the inside of the hull.
Shoot Thru-Hull Installation
The in-hull transducer is designed to be mounted inside a fi berglass hull. The standard plastic
transom mount transducer can also be mounted in this fashion using this method. If using a
temperature sensing transducer, the temperature displayed will refl ect the hull temperature.
Selecting a Location:
1. The location has to be solid fi berglass, devoid of any air bubbles, laminates, fi llers or dead air space.
The location needs to be in an area of clean water at all speeds. Do not place the transducer over
any strakes or behind any obstruction on the hull that would create turbulence at speed.
Many modern hulls have a prelocated pocket for thru-hull transducer installation. If
you are unsure if your hull is equipped with a prelocated pocket, contact your hull
manufacturer.
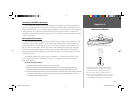
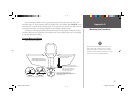
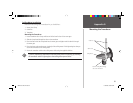
Testing the Location:
1. Place the transducer in the water, pointed directly at the bottom and set unit for optimum
performance. Place the transducer in the test device as show on the side bar. If the sonar
performance is signifi cantly degraded, another location will need to be tested.
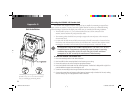
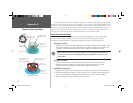
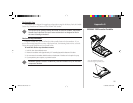
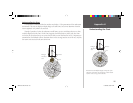
Installing the Transducer:
1. Lightly sand the surface of the hull and face of the transducer with 400 grit wet or dry sandpaper.
2. Build a dam using strip caulk about 1/4” tall. Pour about 1/8” of two part, slow cure epoxy in the
dam. Place the transducer in the epoxy, turning the transducer to work out any air bubbles.
3. Weight the transducer in place and allow to cure for 24 hours.
)
Installing the Transducer
Strip Caulk
or RTV
Sealer Dam
Slow cure
2-part epoxy
Apply twisting motion
to eliminate any
trapped air bubbles
Weight transducer in place
for at least 24 hours
Testing the Location
Strip Caulk
or RTV Sealer
Hull Surface
PVC Pipe
or a Can
Weight transducer
to hold it in place
Fill Pipe or Can
with water or a
light mineral oil
168 Manual Part 2.indd 98 11/18/2002, 3:38:15 PM