


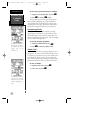

Clearing a Cluttered Map Display
After you’ve used the GPS 12XL for a few trips, you
may find that your map display has become a bit messy
from keeping track of your every move. For practice,
let’s clean up the screen by clearing the track log (the
plot points left on the Map Page) we’ve just created
during the Getting Started tour.
1. Press
P
or
Q
until the Map Page appears.
2. Highlight the ‘CFG’ field and press
E
.
3. Highlight ‘Track Setup’ and press
E
.
4. Highlight the ‘CLEAR LOG?’ option and press
E
.
The clear log confirmation page will appear.
5. Use the
L
key to highlight the ‘Yes’ prompt.
6. Press
E
to finish.
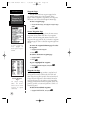
Adjusting Screen Contrast
You can access the GPS 12XL’s contrast feature from
the Satellite Page.
To adjust the screen contrast:
1. Press
P
or
Q
until the Satellite Page
appears.
2. Press
L
or
R
to adjust the level of contrast, and press
E
.
Screen Backlighting
Screen backlighting is available for nighttime use.
Activate backlighting by pressing the
B
key briefly.
Backlighting will remain on for the time specified on
the system setup page (See page 42).
Turning the Receiver Off
You’ve now gone through the basic operation of
your new GPS receiver and probably know a little more
than you think about how it works. We encourage you
to experiment with the GPS 12XL until it becomes an
extension of your own navigation skills. If you
encounter any problems using the unit or want to take
advantage of the GPS 12XL’s more advanced features,
turn to the reference section.
To turn the GPS 12XL off:
1. Press and hold the
B
key for 3 seconds.
11
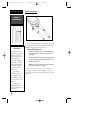
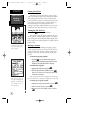
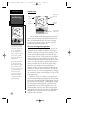
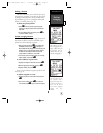
Highlight the ‘CLEAR
LOG?’ prompt and press
ENTER to clear the track
log.
Note: Once all 1024
points are used during
normal operation, the old-
est point will be continu-
ously deleted to make
room for the latest track
log point to be stored.
GETTING
STARTED
Clearing the
Map, Adjusting
Contrast, &
Power Off
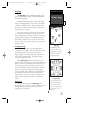
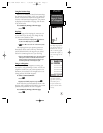
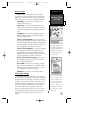
Pressing the LEFT or
RIGHT arrows from the
Satellite Page will auto-
matically activate the
screen contrast bar.
GPS 12XL Manual Rev C 7/10/98 11:18 AM Page 11