Quick Start
11
Simulated Navigation
To display the map pointer:
1. Press the ARROW KEYPAD any direction.
Using the ARROW KEYPAD you can pan the Map Pointer around the map. As you move around
the map, the direction and distance from the Map Pointer to the current GPS location is displayed along
the top of the map.
To mark a waypoint using the map pointer:
1. With the Map Pointer at a location on the map about one mile from your current location, and not on
a road or map feature, press and quickly release the ENTER key.
The location of the Map Pointer will be captured and the New Map Waypoint Page will be dis-
played. Change the waypoint name to “MAP 1”, and save the waypoint by highlighting the ‘OK’ Button
and pressing the ENTER key. Press the QUIT key to hide the Map Pointer and center the map on the
current GPS location. Press the OUT key until the Zoom Scale reads “800ft”.
Now that we have a destination, navigating to it is just a step away.
Going to a waypoint:
1. Press the NAV key.
2. Highlight ‘Go To Point’ then press the ENTER key.
3. Highlight ‘Waypoints’ then press the ENTER key.
4. Highlight ‘MAP 1’ then press the ENTER key.
5. Highlight the ‘Goto’ Button then press the ENTER key.
The GPSMAP 176 is now navigating to the waypoint ‘MAP 1’.
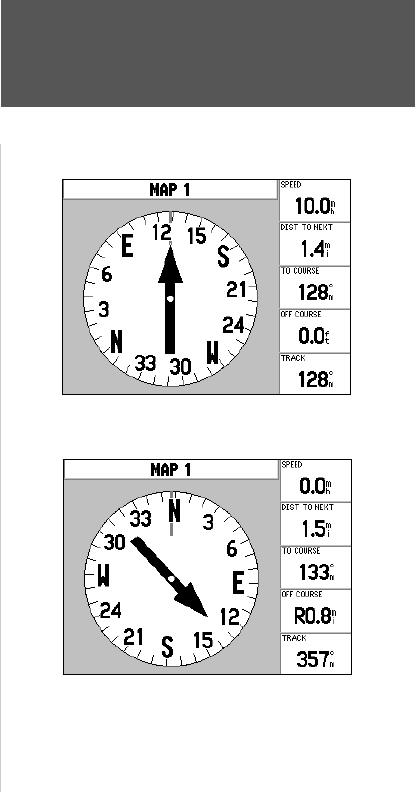
For a GPS to navigate it has to be moving. Fortunately you can simulate movement in the GPSMAP
176. Press the PAGE key until the Compass Page is displayed. Along the right side of the Compass
Page there are several data fi elds. Notice the Speed Field located at the top. To simulate movement,
press the ARROW KEYPAD up one time. This will set a speed of 10 miles per hour. If you continue
to press or hold the ARROW KEYPAD, the speed will increase in 10 mph increments. For this
exercise, 10 mph is fi ne.
Headed Directly Toward Destination
Off Course, Turn Right to Correct
190-00185-02_0A.indd 11 6/17/2002, 1:17:35 PM


