3-4
To change the latitude/longitude...
· Use an arrow key to place the cursor under the latitude field.
· Check the hemispheric designation (“N” or “S”) of the latitude. If it is
correct, go to the next step. If it is incorrect, press the CLR key until
the correct hemispheric designation is displayed.
· Enter the latitude (remember to complete the data entry by pressing
ENT).
· Check the hemispheric designation (“E” or “W”) of the longitude. If it
is correct, go to the next step. If it is incorrect, press the CLR key until
the correct hemispheric designation is displayed.
· Enter the longitude (remember to complete the data entry by pressing
ENT).
3.4 AUTOSTORE
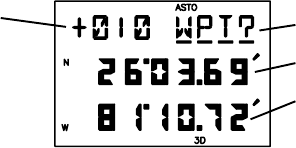
Waypoint
Name Storage Selection
Latitude
Longitude
AUTOSTORE
TM
PAGE
The AutoStore
TM
Page is displayed by pressing the ENT key while viewing
the Position Page. This page allows you to capture your position at the touch
of a button so that you may easily return later. Additionally, you may record
your navigation path by inserting the captured waypoints into a route (see
Section 6.5).
To capture your present position...
· Press NAV until the Position Page is displayed.
· Press ENT. The AutoStore
TM
Page will be displayed with the default
waypoint name on line one. The waypoint name begins with a “+”
character followed by a 3-digit number, for example “+010”.
· If you wish to give the waypoint a name of your own, move the cursor
under the waypoint name and enter the name of your choice.
