


GMR 600/1200 Series Installation Instructions 5
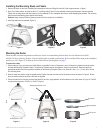
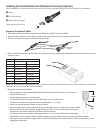
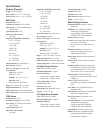
To install the cable assembly:
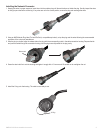
1. Align the notch and locking ring on the power cable to the power connector. Press the 2-pin
power cable to the power connector. Tighten the power-cable locking ring clockwise until it is
rmlysealed..
2. Press the RJ-45 marine network cable to the RJ-45 socket. Tighten the RJ-45 locking ring
clockwiseuntilitisrmlysealed.
3. Route the power and network cables through the front of the radar (Figure 7), or through a
hole drilled through the mounting surface (Figure 8). Avoid excessively bending or twisting the
cables.
4. Install the hatch on the front of the radar.
Figure 7 Figure 8
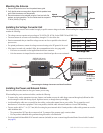
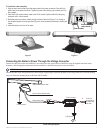
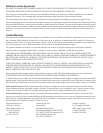
Connecting the Radar to Power Through the Voltage Converter
Connect the radar power cable (red and black) to the voltage converter output cable (red and black) using the supplied heat-shrink crimp
connectors. After crimping the connections, heat the connectors to shrink the housing for a water resistant t.
If you choose to cut the radar power cable, you must reconnect the in-line fuse holder.
Connect the radar to the water ground of the vessel using an 8 gauge copper cable (not included). Secure the ground wire to the radar housing
using one of the four mounting studs, an M10 nut, and at washer.
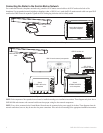
Power Wiring Diagram
10–40 Vdc
(20–40 Vdc for
the GMR 1204
and 1206)
+
-
Garmin marine network cable
Radar power cable
GMR 600/1200 series radar
Power converter
To RF ground
To water ground
7.5 A fuse
Power connector
RJ-45 network
cable connector
Power connector
RJ-45 network
cable connector