


7
00989pr-1056
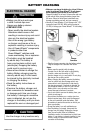
ASSEMBLY
Children can be harmed by small
parts, sharp edges and sharp points
in the vehicle's unassembled state,
or by electrical items. Care should be
taken in unpacking and assembly of
the vehicle. Children should not handle
parts, including the battery, or help in
assembly of the vehicle.
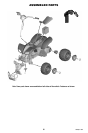
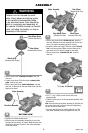
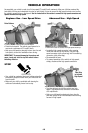
• Slide a wheel cover, indented side down, onto the
rear axle.
• Locate a rear wheel. Slide the wheel, indented side
down, onto the rear axle.
• Slide a rear wheel driver, slotted side down, onto the
rear axle. Fit the slots on the rear wheel driver onto the
pegs on the wheel.
Rear Wheel Driver
(Slotted Side Down)
Wheel Cover
(Indented Side Down)
Rear Wheel
(Indented Side Down)
1
2
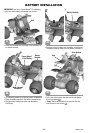
• Position the vehicle upside down.
• Slide the rear axle assembly through the hole in the
back end of the vehicle, as shown. Make sure the rear
wheel driver fits into the pins in the motor assembly
inside the vehicle.
3
Rear Axle Assembly
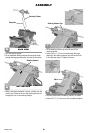
• Slide a rear wheel driver, slotted side out, onto the
rear axle. Make sure the rear wheel driver fits into the
pins in the motor assembly inside the vehicle.
• Locate the other rear wheel. Slide the wheel, flat side
first, onto the rear axle. Make sure the slots on the
rear wheel driver fit onto the pegs on the wheel.
• Slide a wheel cover, indented side out, onto the
rear axle.
Rear Wheel
(Pegged Side First)
BOTTOM VIEW
Rear Wheel Driver
(Slotted Side Out)
Wheel Cover
(Indented Side Out)
Motor Assembly
Motor Assembly
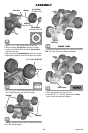
•
Fit a
3
/8" (1 cm) -16 hex nut onto the end of the rear
wheel assembly.
• Tighten the hex nut on of the rear wheel assembly with
the wrench.
Hint: An extra wrench has been provided to hold the hex
nut on the other side of the rear axle while tightening
the hex nut on the other side.
• You may need the help of another adult to hold the
rear wheel assembly while you tighten the hex nut.
4
Wrench
3
/8" (1 cm) -16 Hex Nut
WARNING