


10
11
ASSEMBLY
F
J5244pr-0920
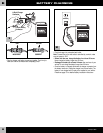
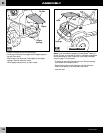
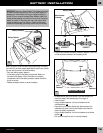
• Insert both tabs on the seat into the slots in the vehicle.
9
Slots
Seat Tabs
11
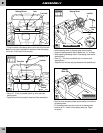
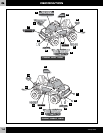
• Using safety scissors, remove the taillight lenses from the plastic
connector. Dispose of the plastic connector.
• Face the rear of the vehicle.
• Insert the tabs on the back of the right and left taillight lenses into the
taillight slots in the vehicle body.
Note: The left and right taillight lenses are NOT interchangeable.
• Press firmly to snap the tabs into the slots.
Right
Taillight
Lens
Left
Taillight
Lens
Left Right
Slots
Tab
• Make sure both seat belt straps are fastened together. If they are
not fastened together, connect them to form one seat belt.
• Insert the T-tab at one end of the seat belt through the slot in one
arm of the seat. Do not pull the second T-tab through the slot.
• Repeat this procedure to secure the other end of the seat belt in the seat.
• Pull up on the seat belt to make sure it is securely attached to the seat.
Slot
Second
T-tab
Second
T-tab
Bottom
T-tab
Seat Belt Straps
Seat
8
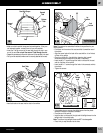
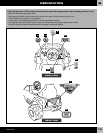
Note: The seat can be assembled in either of two positions for your
child’s comfort.
• Push down on the center of the seat and slide it toward the rear of
the vehicle.
• Align the screw holes in the back of the seat with the 1st or 2nd set
of holes in the vehicle.
• Check your child’s fit in the vehicle by observing foot to pedal
distance and adjust the position of the seat, if necessary.
• Insert two #8 x 1" screws through the holes in the back of the seat
and into the holes in the vehicle.
• Insert two #8 x 1" screws through the holes in the armrests and into
the vehicle.
• Tighten the screws.
1st
Position
2nd
Position
PUSH
HERE
REAR VIEW