


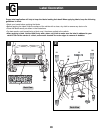
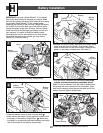

Inside Edge
of Sport Bar Support
Assembly
32
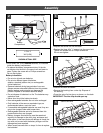
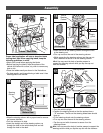
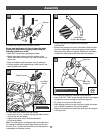
•Fit a sport bar support to one side of the sport bar.
•Insert a #8-32 x 1.625
"
screw through the sport bar support,
the sport bar and out through the sport bar support.
• Fit a lock nut to the end of the screw.
• While holding the lock nut with the pliers, tighten the screw
with a Phillips screwdriver. Do not over-tighten.
• Repeat this procedure to attach the other sport bar support
to the sport bar.
Sport Bar
Sport Bar
Supports
33
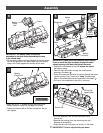
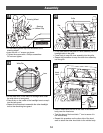
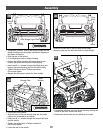
Squirter
• Remove the squirter from the water cannon.
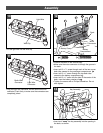
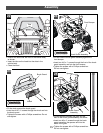
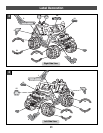
Proper label application will help to keep the labels
looking their best! When applying labels, keep the
following guidelines in mind:
•Wash your hands before applying the labels.
• Before applying the labels, wipe the surface of the
vehicle and radio with a clean, dry cloth to remove any
dust or oils.
• Place the labels exactly as shown in the illustrations.
•For best results, avoid repositioning a label once it has
been applied to the vehicle.
• Locate both sport bar supports and the labels
numbered 25.
• Remove the backing from one of the labels. Start the label
from the inside edge of a sport bar support and wrap the
label around the sport bar support. Repeat this procedure
to attach the other label to the other sport bar support.
30
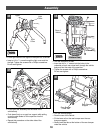
Water Cannon
Left Rear
Fender
•Fit the water tank onto the left rear fender.
•Insert two #10-32 x 1
"
screws through the water cannon
and into the left rear fender.
• Tighten the screws with a Phillips screwdriver.
Do not over-tighten.
Hint: The water cannon is designed to be removable from
the vehicle for additional rescue play! Simply remove the
two #10-32 x 1
"
screws and store them in a safe place for
re-assembly of the water cannon.
31
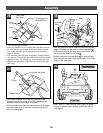
23
24A
24B
28
13
17
25