


10
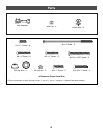
Assembly
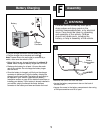
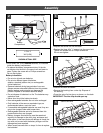
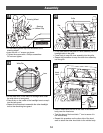
Dash
• Replace the sound unit into the dash.
• Replace the three #8 x
3
/
4
" screws into the sound unit.
Tighten the screws with a Phillips screwdriver.
Do not over-tighten.
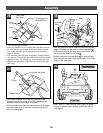
Sound Unit
3
• Insert three “AA” (LR6) alkaline batteries, as indicated
inside the battery compartment.
•To replace the battery compartment door, fit the tab
on the door into the slot in the sound unit and lower to
close. Tighten the screw with a Phillips screwdriver.
Do not over-tighten.
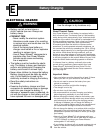
Battery Information
• Do not mix old and new batteries.
• Do not mix different types of batteries:
alkaline, standard (carbon-zinc) or rechargeable
(nickel-cadmium).
•Remove batteries during long periods of non-use.
Always remove exhausted batteries from this product.
Battery leakage and corrosion can damage this
product. Dispose of exhausted batteries safely.
• Do not dispose of batteries in a fire. The batteries may
explode or leak.
•Never short circuit the battery terminals.
• Non-rechargeable batteries are not to be recharged.
•Only batteries of the same or equivalent type, as
recommended above, are to be used.
• If removable rechargeable batteries are used, they are
only to be charged under adult supervision.
• Rechargeable batteries are to be removed from this
product before they are charged.
• Battery chargers used with toys must be examined
regularly for damage to the cord, plug, enclosure and
other parts. In the event that such damage is found, the
toy must not be used with the battery charger until the
damage has been repaired.
• When sound becomes faint or stops, it's time to replace
the batteries!
Battery
Compartment
Battery Compartment Door
Tab
1.5V x 3
“AA” (LR6)
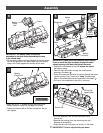
2
Dash
•Position the dash face down.
•Remove the backing from a wire clip. Dispose of
the backing.
• Press the wire clip into place, as shown, on the dash.
IMPORTANT! The wire clip should open up.
Wire Clip
Opens Up
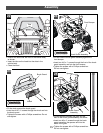
4
Sound Unit Wire
Wire Clip
• Fit the sound unit wire into the wire clip.
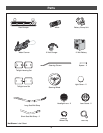
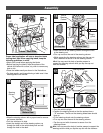
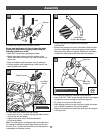
5
SHOWN ACTUAL SIZE