


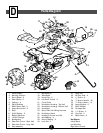
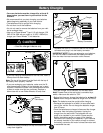
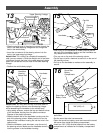
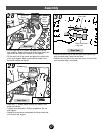


• Slide the straight end of the steering column through the
hole in the lower steering linkage and out through the
hole in the vehicle body.
• Insert the curved end of the steering column into the
hole in the upper steering linkage.
Helpful Hint: If it is difficult to complete this assembly
step, you can reverse it. Slide the straight end of the steer-
ing column through the hole in the upper steering linkage
and fit the curved end into the hole in the lower steering
linkage.
• Position the vehicle body upright.
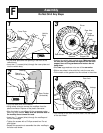
Lower
Steering
Linkage
Upper Steering Linkage
Steering
Column
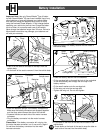
Rim
Hole
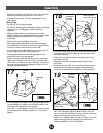
Handlebar
Housing -
Bottom Half
Handlebar
Housing -
Bottom Half
Handlebar
Neck
Grooves
Handlebar
Helpful Hint: You may want the help of another adult to
support the steering column near the steering linkage
while assembling the handlebar to the vehicle body.
• Using safety scissors, remove the top and bottom halves
of the handlebar housing from the plastic connector.
Dispose of the plastic connector.
• Slide the bottom half of the handlebar housing onto the
end of the steering column. Make sure the rim on the
bottom of the handlebar housing fits into the hole in the
vehicle body.
• Slide the handlebar, neck side down, onto the end of
the steering column. Make sure the handlebar arms fit
into the grooves in the handlebar housing.
13
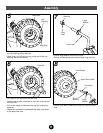
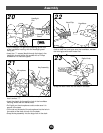
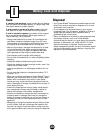
Steering
Column
Cap Nut
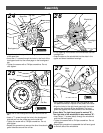
Sound Box
Battery Cover
Sound Box
Battery
Compartment
• Push firmly on the handlebar to make sure that the bot-
tom half of the handlebar housing and the handlebar are
fully seated on the vehicle body.
• Fit a cap nut on the end of the steering column.
• Tap the cap nut with a hammer to secure it on the end of
the steering column.
• Pull up on the handlebar to make sure the assembly is
secure.
• Unplug the sound box wire harness connectors from the
sound box.
• Set the sound box wire harness aside.
• Open the sound box battery cover and remove the sound
box screw from inside the battery compartment.
• Insert two "AA" (LR6) alkaline batteries into the battery
compartment as indicated on the battery compartment
cover.
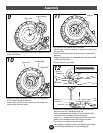
15
16
Steering
Column
14
Assembly
Bottom View
"AA" (LR6) x 2
-
+
Hole in
Vehicle
Body
13