


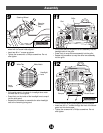
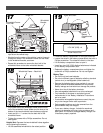

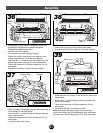


• Fit the back half of the windshield frame onto the front
half of the windshield frame. Make sure the slots at the
bottom of the two windshield frame halves are aligned.
• Insert ten #8 x 1
1
/
4
" screws into the back half of the
windshield frame.
• Tighten the screws with a Phillips screwdriver. Do not
over-tighten.
Helpful Hint: Squeeze the two windshield halves together
while tightening the screws.
• Lift the assembled windshield to the raised position.
Slots
Windshield Frame –
Front Half
Windshield Frame – Back Half
18
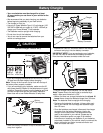
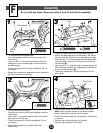
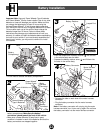
• Locate the battery compartment on the lights and siren.
• Loosen the screw in the battery compartment door with a
Phillips screwdriver. The screw will remain in the door.
• Lift the battery compartment door to open it.
• Insert four size “AA” (LR6) alkaline batteries as indicated
on the battery compartment door.
• Replace the battery compartment door and tighten the
screw with a Phillips screwdriver. Do not over-tighten.
1.5V “AA” (LR6) x 4
Shown Actual Size
Battery
Compartment
Door
Lights and Siren
19
Battery Tips:
• Do not mix old and new batteries.
• Do not mix different types of batteries: alkaline, standard
(carbon-zinc) or rechargeable (nickel-cadmium).
• Remove the batteries during long periods of non-use.
Always remove exhausted batteries from the product.
Battery leakage and corrosion can damage the product.
• Never short circuit the battery terminals.
• Non-rechargeable batteries are not to be recharged.
• Only batteries of the same or equivalent type as
recommended in the “Battery Installation” instructions
are to be used.
• If removable rechargeable batteries are used, they are
only to be charged under adult supervision.
• Rechargeable batteries are to be removed from the
product before they are charged.
• If you use a battery charger, it should be examined
regularly for damage to the cord, plug, enclosure and
other parts. Do not use a damaged battery charger until
it has been properly repaired.
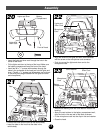
Assembly
16
17
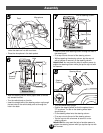
Windshield Frame -
Front Half
Hinge Pin
Windshield
Bracket
• Rotate the front half of the windshield frame down so it
lays flat on the vehicle body.
• Working from the center of the vehicle, insert a hinge pin
through the holes in the windshield frame and the holes
in the windshield bracket, as shown.
• Repeat this procedure to secure the front half of the
windshield frame to the other windshield bracket.