


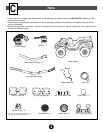
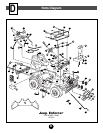
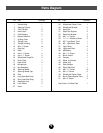


4
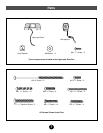
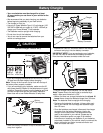
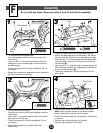
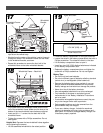
Dash
Knob Plate
Key Assembly
• Snap the dash knobs into the knob plate. (See inset.)
Note: Gently squeeze the tabs on the knobs together
before inserting the knobs into the knob plate.
• Position the bottom edge of the knob plate in the opening
in the dash.
• Snap the top of the knob plate into the dash.
• Snap the key assembly into the dash.
• Position the dash on the vehicle body. Make sure the
holes in the dash tabs align with the holes in the vehicle
body and that the channel cover is captured by the dash.
• Insert two #10 x 1" screws through the holes towards the
rear of the dash (closest to the hood area) and into the
vehicle body .
• Insert two #10 x
1
/
2
" screws through the holes towards the
front of the dash (closest to the passenger compartment)
and into the vehicle body .
• Tighten the screws with a Phillips screwdriver. Do not
over-tighten.
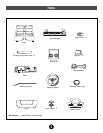
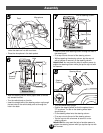
Assembly
Do not omit any steps. Please set aside at least 45 minutes for assembly.
F
3
12
21
1
1
2
2
2
1
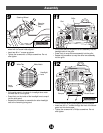
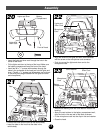
• Turn the vehicle body upside down.
• Fit the left sidepipe under the left (driver) side of the
vehicle body.
• Insert two #8 x
3
/4" screws through the top of the left
sidepipe and into the screw pegs on the underside of
the vehicle body.
• Tighten the screws with a Phillips screwdriver. Do not
over-tighten.
• Repeat this procedure to assemble the right sidepipe to
the right side of the vehicle body.
Left Sidepipe
Dash
Channel
Cover
Tab
Screw Pegs
Vehicle
Body
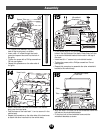
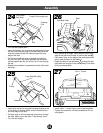
• Turn the vehicle body upright.
• Gently bend the tab on one of the sidepipes under the
vehicle body.
• Insert a #8 x
3
/4" screw through the hole in the vehicle
body floor and into the tab.
• Tighten the screw with a Phillips screwdriver. Do not
over-tighten.
• Repeat this procedure on the other side of the
vehicle body.
Tab
Rear of Vehicle
Rear of Vehicle
2
1