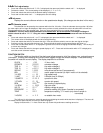
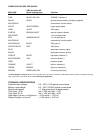
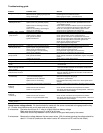
MAN# 650280:D
W
WW
WX
XX
XArn
ArnArn
Arn
V
Voltage warning setup
• Press and release the switch until “WXArn
V
” is displayed, then press and hold the switch until “ - “ is displayed.
• Release the switch. The current warning point will be displayed (9.0 – 12.1).
• Press and release the switch until the desired setting is displayed.
•
Press and hold the switch until “ - ” is displayed to save the setting.
Sender
SenderSender
Sender
P
Pressure sender setup
The gauge can use the following Dakota Digital pressure sensors: SEN-1031 (0-150 psi), SEN-1032 (0-75 psi), or
SEN-1035 (0-400 psi)
• Press and release the switch until “Sender
P
” is displayed, then press and hold the switch until “ - “ is displayed.
• Release the switch. The current sender type will be shown (75, 150, or 400).
• Press and release the switch until the desired setting is displayed.
•
Press and hold the switch until “ - ” is displayed to save the setting.
WXarn
WXarnWXarn
WXarn
P
Pressure warning setup
• Press and release the switch until “WXarn
P
” is displayed, then press and hold the switch until “ - “ is displayed.
• Release the switch. Lo and number from 5-36 will be displayed for the low pressure warning point.
• Press and release the switch until the desired value is displayed.
•
Press and hold the switch until “ - ” is displayed to go on to the high warning.
• Release the switch. HI and number from 37-75, 75-150, or 150-300 will be displayed for the high pressure warning point
depending on the sender type selected.
• Press and release the switch until the desired value is displayed.
•
Press and hold the switch until “ - ” is displayed to save the setting.
Set FC
Set FCSet FC
Set FC Temperature sender setup
The gauge can use the following Dakota Digital temperature sensors: SEN-1043 (400F/200C) or SEN-
1044(302F/151C)
• Press and release the switch until “Set FC” is displayed, then press and hold the switch until “ - “ is displayed.
• Release the switch. The current sender type will be shown with its unit. (400F, 200C, 302F, or 151C).
• Press and release the switch until the desired setting is displayed.
•
Press and hold the switch until “ - ” is displayed to save the setting.
HI F-C
HI F-CHI F-C
HI F-C Temperature warning setup
• Press and release the switch until “HI F-C” is displayed, then press and hold the switch until “ - “ is displayed.
• Release the switch. H and number from 200F – 350F or 93C – 176C will be displayed.
• Press and release the switch until the desired value is displayed.
•
Press and hold the switch until “ - ” is displayed to save the setting.
gEAr
gEArgEAr
gEAr Gear Indicator setup
This gauge has a single digit display for gear position. The gauge can learn the gear ratios based on speed and rpm
so no sensors are needed, just what you’ve already connected. It will work with 4, 5, 6, or 7 speed transmissions. To
program the gear positions, begin at a section of road where you can gradually shift through all of the gears. Press and
hold the switch while turning the key on and starting the engine. Once the engine is running, release the switch.
• Press and release the switch until “gEAr” is displayed, press and hold the switch until “ - “ is displayed.
• Release the switch. The display will show either “OFF” or “SET”.
• Press and release the switch until “SET” is shown, then press and hold the switch until “ - “ is displayed.
• The message will show “LO TCH” if the engine rpm is below 1500, or “LO SPD” if the vehicle speed is below 5.
• Begin driving in 1
st
gear. The display should show GEAR 1 and the “1” should be flashing. Drive at a steady speed until
the “1” stops flashing, it should only take about 20 seconds if the speed and RPMs are steady.
Optionally: If the gear does not stop flashing you can manually override and jump to the next gear by pressing and
releasing the switch to store the gear position quicker.
• Shift to 2
nd
gear and drive at a steady speed. The display will change to a flashing “2”.
• Wait until the “2” stops flashing. Shift to the next gear and a “3” should start flashing.
Optionally: If the gears do not stop flashing you can manually override and jump to the next gear by pressing and
releasing the switch to store the gear position quicker.
• Repeat this through each gear. When you are done, come to a complete stop or press and hold the switch until the display
shows “SETvP” and then release it.
• Turn the key off and then on again to restart the gauges in normal operation, verify the gear position by riding through each
gear and seeing if positions agree.


