


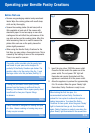


3. Cut 2 pastry tops and 2 bases by positioning the
cutter over a flat sheet of pastry and press down
firmly into the pastry. Do not twist. Ensure the cut
is smooth around the edges (see Fig.3).
4. Place the pastry base into the centre of the pie
dish and gently press to mould to the shape of
the dish, ensuring the edges of the pastry
overlap the crimping area of the pie dish.
5. Spoon pre-cooked and cooled filling into the
pastry base. It is recommended that a
1
⁄
3
cup of
filling be used unless specified in the recipe. Do
not overfill the pastry bases.
Do not use liquid ingredients only (such as
sauces, gravies and custard) or in large amounts
as the pie fillings, as they will overflow and
make the pastry soggy. Always combine with
solid ingredients.
Note
6. Place the pastry tops over the filling, ensuring the
edges of the pastry top are positioned evenly
over the pastry base edge.
7. Close the lid, ensuring the locking latch clicks
into position. The lid must be closed at all times
when baking. It is advised that the pies are
checked regularly until desired shade of
golden brown.
8. Different pastries require varied cooking times.
For thin pastries, such as puff pastry, allow pies
to cook for 6-8 minutes or until desired shade of
golden brown. For thicker pastries, such as
shortcrust pastry, allow pies to cook for 8
minutes plus or until desired shade of golden
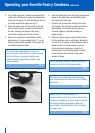
brown. Remove the pies with a heat-proof
spatula or tongs.
Do not use metal utensils as these may scratch
the non-stick finish of the cooking plates.
Note
Pie bases can be made with shortcrust pastry
and pie tops made with shortcrust, puff or butter
puff pastry.
Note
Before baking the next two pies, it is
recommended to close the lid and to allow Pastry
Creations to preheat for a few minutes to achieve
the optimum baking temperature. When the
green 'Ready' light illuminates, Pastry Creations
is ready to use.
Note
8
Operating your Breville Pastry Creations
continued
Fig 3