


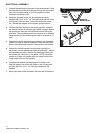


ELECTRICAL-ASSEMBLY
12
64060 (2005-810&8611SkidSteer).doc
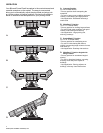
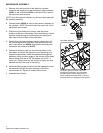
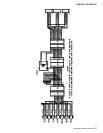
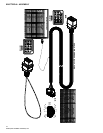
1. Connect the manifold coil harness to the plow harness. Feed
the opposite end of the plow harness through the top access
hole in the A-frame (same as 3/4" tank hydraulic hose)
located on the driver’s side.
2. Attach the grounds on the coil wire harness and plow
harness with a 3/8"-16 x 1-1/2" hex cap screw and 3/8" tooth
lock washer to the A-frame. Secure the wires with a lock
nut. Review the diagram for the proper ground location.
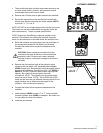
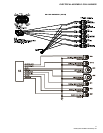
3. Connect the plow harness to the vehicle harness, and then
the vehicle harness to the pistol grip control harness. Attach
the ground wire from the vehicle harness to the cab of the
skid steer. The pink/black power wire connects to a switched
power source (on and off with ignition) with a minimum of 12
volts.
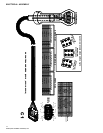
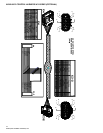
4. Position the vehicle harness mount bracket in an accessible
location for easy on-and-off installation inside the skid steer.
Secure the vehicle side harness in the notch on the bracket.
5. Position the control harness mount bracket vertically or
horizontally for user preference inside the skid steer. Secure
with hardware provided. Position the pistol grip control into
the bracket and “twist-lock” it into place. NOTE: Install the
bracket so it does not interfere with any safety devices that
might rotate in front of the operator.
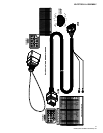
6. Complete the assembly by attaching the A-frame cover.
Align the holes in the cover with those on the A-frame and
secure it with 3/8"-16 x 1-1/2" hex cap screws and 3/8"
washers.
7. Mount your plow to the skid steer, and then test all functions.
Control Mount Bracket (70048)
MANIFOLD
MOUNT HOLES
GROUND
MOUNT
HOLE