


17
INDICATOR LIGHT
An optional indicator light (LED) can be added to the system to show the status of the safety sequence (on vehicles
equipped with a manual transmission), and the status of the safety system, the antitheft system or the Valet Mode.
See ‘Indicator Light’ in the ‘Safety System’ Section.
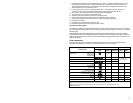
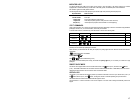
The following table shows the codes displayed by the indicator light when performing the safety sequence.
Repeated flashes Phase or Status
3 double flashes
Start of sequence.
2 double flashes
Door open.
1 double flash
Door closed (waiting for engine to stop).
1 single flash
Valid safety sequence (system is ready to receive a start command).
Fast (10 sec.)
Invalid sequence (sequence must be started over from beginning).
UTILITY COMMANDS
These commands allow you to control most of the vehicle accessories depending on what was connected during installation
(headlights, defroster, etc.). For more information, check with your technician.
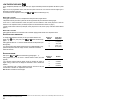
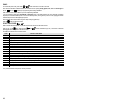
To activate these functions, simultaneously press the buttons as shown in the following table.
The accessory associated to each of these commands is activated for the duration set at time of installation.
The delay can be canceled by repeating the command.
When accessory is deactivated after the delay has expired, the parking lights blink once then the remote control sends a
confirmation.
* Programmable at time of installation.
CAR FINDER
Press and buttons simultaneously (2 sec.).
This function sounds the horn (short melody) and flashes the parking lights so you can locate your vehicle in a large
parking lot.
REMOTE SILENT MODE
The remote can be programmed to be used in silent mode. Press on the button (2 sec.) and then on the button
(2 sec.). The audible confirmations from the remote control are Deactivated/Reactivated. In Silent Mode, the remote control
vibrates three times instead of once to confirm an Alarm or Pre-Shock Status.
KEYPAD LOCK
The keypad of your remote can be locked to prevent any unwanted commands to be sent to your vehicle. Press (2 sec.) on
the
button and then (2 sec.) on the button. The keypad is locked or unlocked depending on its previous status.
Note that the Panic command is still available while the keypad is locked.
The transmission of a Panic command as well as the reception of an alarm status message automatically unlocks the
keypad.
Command Buttons Corresponding accessory Duration
UTILITY 1*
and
UTILITY 2
and
UTILITY 3
THEN and
UTILITY 4
THEN and