


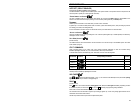

12
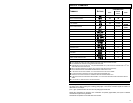
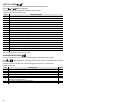
The following table shows the meaning of zone codes (number of flashes).
ZONE CODES
FLASHES ZONE INDICATED
1
System is armed.
2
A door is/was open.
3
Hood is/was open.
4
Alarm condition is/was detected on shock sensor input.
5
Key is/was in the run position.
6
Alarm condition is/was detected on additional sensor input.
Additional sensor monitors status of ___________________________________________________
7
Loss of power (+12V battery supply was removed).
8
Alarm status is/has been detected on pre-shock sensor input.
Indicator can show two other conditions:
CONSTANT DIM LIGHT Indicates that alarm is permanently disarmed. See "VALET MODE" on page 15.
RAPID FLASHES Indicates that system is in rearming cycle.
See " SEMI-PASSIVE REARMING" and "PASSIVE REARMING" on page 10.
SECONDARY FUNCTIONS
ANTI-LOCK
When connected, this function prevents system from locking the doors during automatic rearming if key is in the ignition.
It can also be connected to a switch to select automatic locking as ACTIVE or INACTIVE.
TEMPORARY VALET MODE (ALARM)
This mode is used to cancel automatic rearming for an indefinite period of time.
You will find this mode useful when fuelling up or working on your vehicle.
To activate Temporary Valet Mode, press
button during rearming cycle (indicator light flashes rapidly).
When light stops flashing, it confirms that Temporary Valet Mode has been activated.
To cancel this mode, place ignition key in RUN position then remove it; passive rearming is reactivated when you open a
door.
You can also arm the system using the remote, which cancels Temporary Valet Mode.
VALET MODE
This mode is used to deactivate alarm permanently when you take your vehicle in for servicing for
example. It can be de/activate by the remote (see table of commands, page 5) or by the Valet switch.
Valet switch activates Valet Mode or terminates alarm condition when your remote control is not
available (lost, batteries dead, etc.).
This switch must be installed in a hidden place known only to regular users of the vehicle.
Ask your installer to tell you where it is.
T
O ACTIVATE VALET MODE, place ignition key in RUN position then press Valet switch (for about 3 seconds) until indicator
light comes on at half-brightness, parking light flashes four times to confirm that mode was enabled.
T
O DEACTIVATE VALET MODE, place ignition key in RUN position then press Valet switch (for about 3 seconds) until indicator
light goes out, parking light flashes twice to confirm that mode was disabled.
Notes
If you perform both sequences one after the other, you need to pause for 3 seconds between the two sequences.
Valet Mode is automatically deactivated when key is turned to the RUN position for the tenth time. This is to prevent Valet
Mode from being left on for long periods of time.