6 15
Connecting one 1s to 10s Cellpro pack
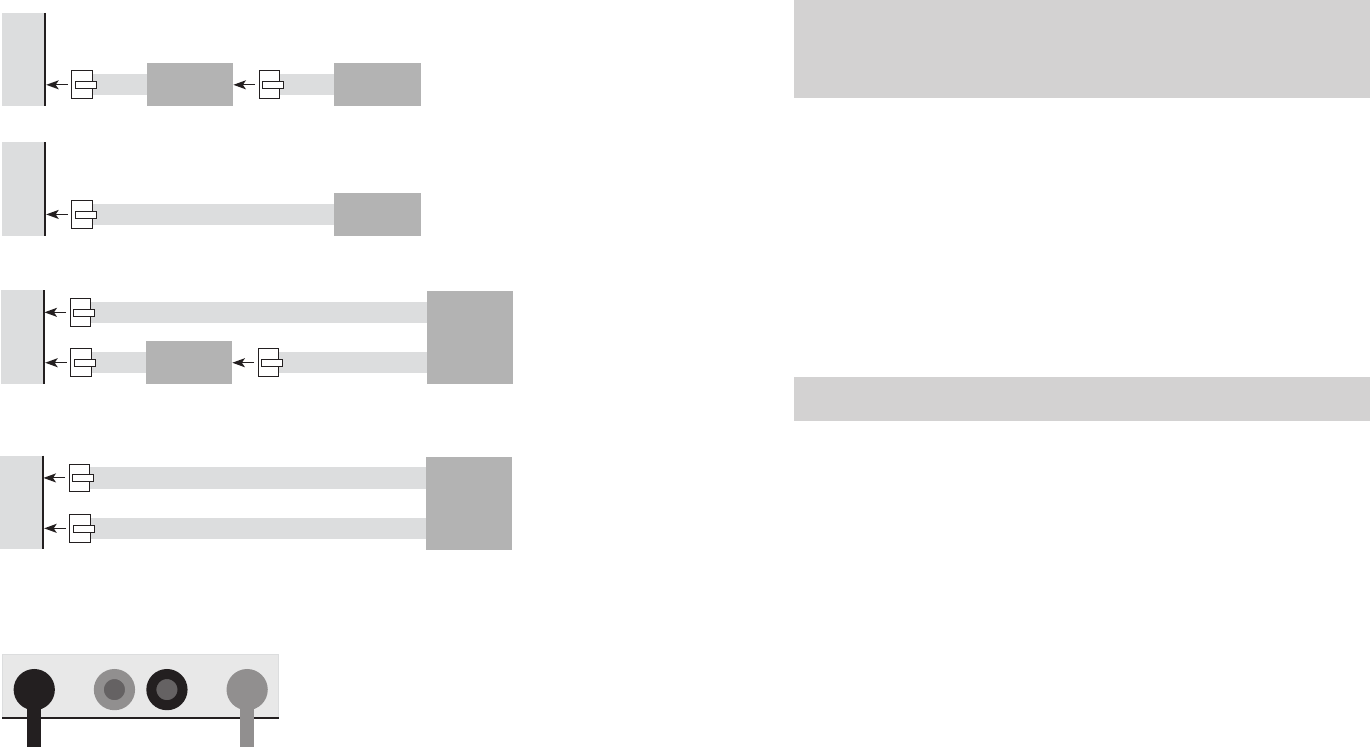
1. How you connect the Cellpro pack’s node connector(s) to the charger depends on the pack’s
conguration.Findthepack’scongurationinthediagramsbelow,thenconnectasshownin
that diagram.
2. If you are using the discharge wires during charging, plug the discharge wires into the outer
-
most banana jacks.
or
If you are not using the discharge wires during charging, insert the Plug Blocker into the out
-
ermost banana jacks.
6-pin to 5-pin
Adapter
1s to 4s
Cellpro pack
Ch2
Ch1
5s
Cellpro pack
Ch2
Ch1
6-pin to 5-pin
Adapter
6s to 9s
Cellpro pack
Pack positive and
higher-numbered nodes
Pack negative and
lower-numbered nodes
Ch2
Ch1
10s
Cellpro pack
Pack positive and
higher-numbered nodes
Pack negative and
lower-numbered nodes
Ch2
Ch1
+–
1
2
Dening presets
Youcandeneuptosixpresetchargingcongurations.Eachpresetconsistsofaname,achem-
istry and a charge current. See “Selecting a preset,” earlier in this manual, for instructions on
selecting a preset for charging.
Note: Remember that presets can be overridden at the charger. Preset changes made
at the charger are retained in the charger until manually changed again, or until a new
group of presets is downloaded to the charger. When you connect the charger to the
computer and launch the Charge Control Software, the program uploads and displays
the presets stored in the charger.
Perform all preset operations in the Presets tab.
To dene a preset:
1. In the
Nameeld,enteranameforthepreset.
2. In the
Chemeld,selectthechemistry.
3. In the
Ampseld,selectthechargecurrent.
4. If this preset will be used to charge a 6s to 10s pack, activate the
Single Pack option (this
enables the charger to treat Ch1 and Ch2 as a single channel).
To download presets to the charger: Click Update Charger. The charger will beep when
downloading is complete.
or
To ignore changes and restore the previous presets: Click Cancel.
To restore the factory settings: Click Factory Default, then click Update Charger.
Note: This restores the factory default presets, and also resets the LCD contrast,
speaker settings and auto scroll settings.
Setting charger options
1. Click the Options tab.
2. Set options as desired:
LCD Contrast sets the contrast of the charger’s LCD display. The display will be easier
to read in bright conditions when the contrast is high.
Auto Scroll Cells ON option, when activated, directs the charger to scroll through screens
during charging.
Auto Scroll Seconds controls how long each screen is displayed.
Speaker Volume controls the loudness of the charger’s speaker. If you want the charger
toconrmwhenyoupressthe
Mode button and Start/Stop button, activate the Button
Clicks ON option. Deactivate the Speaker ON option to mute the charger.
3. Click
Update Charger.
or
If you don’t want to apply the changes, click
Cancel.
