


UNIQUE FEATURES
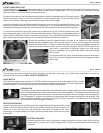
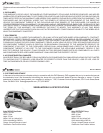
INSTRUMENT PANEL
There are three main components of the instrument panel, the speedometer, the voltage meter
and the ammeter( .
The inner dial of the speedometer indicates speed in MILES per hour, the outer in KILOMETERS
per hour. Also on the speedometer, you will find the overall odometer and the trip odometer as
well as blinkerindicators, high beam indicator andreverse indicator.
The trip odometer is re-settable using the small red button between the dials. We recommend
you use it to keep track of the distance driven since the last charge to determine your battery
capacity or consumption.
The Sedan is equipped with both a voltage meter (to indicate battery voltage), and an ammeter
(to indicate current draw). With these two gages, you can get a better indication of your vehicle's
performance. Generally speaking, the harder the motor is working the more current it will draw
and the lower the battery voltage will drop, at least momentarily. This means that starting from a
stop, climbing hills, and driving at higher speeds will all increase power demand from the motor
and reduce range. Your vehicle will be operating most efficiently when the voltmeter reads higher
voltages and the ammeter reads lower current draw. Familiarize yourself with the interaction of
these indicators to maximize range. The conservative driving techniques discussed elsewhere in
this manual willhelp you attain this result.
Also on the voltage meter are red indicator lights for high motor temperature, low battery voltage
and hand brake engaged. The brake light will also illuminate if the master brake cylinder needs
attention or ifthe brake fluid is low. See MAINTENANCE section.
speedometer and voltagemeter only on the ZAPTRUCK)
NOTE: Pin-point accuracy is not achieved with this voltage meter. It is a relative measurement to aid you while
driving.Periodically checkyourbattery voltagewithadigital meter.SeeBATTERYsection.
5
1
2
3
4
5
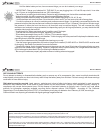
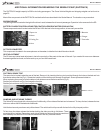
1.Speedometer
2.
Voltagemeter
3.Odometer/Tripodometer
4.Tripodometerresetbutton
5.Hazardlightsflasherbutton
6.Handbrakeengagelight
7.LowBatteryindicator
8.Highmotortemperaturelight
Owner’sMan
ual
6
7
8
XebraSedanPanel
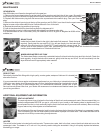
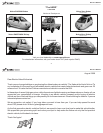
XebraZAPTRUCKPanel
1
2
3
4
5
6
7
8
1.Speedometer
2.Voltagemeter
3.Ammeter
4.Odometer/Tripodometer
5.Tripodometerresetbutton
6.Hazardlightsflasherbutton
7.Handbrakeengagelight
8.LowBatteryindicator
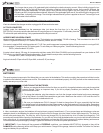
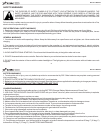
IGNITION
MASTER OFF BUTTON
DIRECTION KNOB
POWER CORD
Put the key into the ignition and turn it clockwise one or two clicks. Unlike a traditional engine, you will Not hear a loud
noise or revving. You may hear the sound of the motor cooling fan. The cooling fan is operated by a temperature
sensor on the motor. If the motor gets hot (60 degrees C), the cooling fan turns on. If you open the window, the sound
will be louder.See DRIVE MOTOR section for moreinformation.
As you select on the console, you will hear clicks as relays are activated (see Direction Knob
below).
Under the driver's seat is a large red button. It is operated by pushing in for off and pulling out for on. This button
disables the entire 72 volt electrical system. You may want to push it in if: you plan on leaving the car idle for
many days; forsafety during repairs; in theevent the car isdamaged in an accident, etc.
This button MUSTBE PULLED OUTfor normal operation andcharging the vehicle.
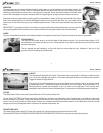
Located on the console is the directional knob. This is a three position turn switch that controls the forward,
neutral and reverse functions. Simply turn the knob to F for forward, N for neutral and R for reverse. To drive
in reverse, you must also press the red Reverse button, which will activate the reverse safety beeper. The
purpose of this extra step is to prevent the rapid change of direction while the motor is still turning. Changing
direction while the motor is turning can damage the motor controller and shorten its life. Make sure the car is
completely stopped beforechanging directions.
The Xebra comes standard with a 10 foot power cord for charging, stowed to the right of the front passenger's seat. If you choose to
use an extension cord, a heavy duty 12AWG (or known as #12/3) extension cord is necessary. Ideal length is no longer than 25 feet. If
a cord is longer than 25 feet, use 10AWG cord. Be sure the charging cord is disconnected before driving. Be responsible with
your cord. Positionit to avoid tripping overit, driving over it,dropping things on it orotherwise damaging it.
forward or reverse
(#10/3)
6
Owner’sManual