


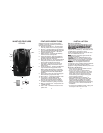
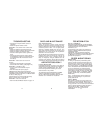

Windshield Mounting
•
Install the two suction cups and rubber bumper
onto the bracket by fitting them into their holes.
•
Press the suction cups onto the windshield at the
location you have chosen.
• Slide the detector onto the bracket until it locks
into place.
• If necessary, the unit may be leveled by bending
the windshield bracket.
• Press the bracket release button and remove the
detector before bending.
Power Cord Connection
• Plug the small end of the power cor
d into the
unit’s power jack.
• Plug the large end into the vehicle’s cigarette
lighter socket.
N
N
o
o
t
t
e
e
:
:
Cor
d fits tightly into detector
. When installing
the cord, expect some resistance.
Fuse Replacement
The lighter socket plug is equipped with a
replaceable 2 amp, 3AG fuse located behind the
silver tip. To replace the fuse, carefully unscrew
the tip of the plug.
I
I
m
m
p
p
o
o
r
r
t
t
a
a
n
n
t
t
:
:
Unscrew slowly. The tip contains a spring
which may fly out when disassembling. Insert the new fuse
with the spring and screw on the tip. With use, screw cap
on plug may loosen. Retighten occasionally
.
Unscrew the tip of the lighter socket plug
carefully when replacing the 2 amp fuse.
INSTALLATION
Battery Life
The unit can provide approximately 15 hours of
laser/radar detection. There are settings that can
m
aximize battery life.
1) Display intensity set to Dim
2) Auto Quiet engaged
3) Auto Shut Off
set to 1 hour
4) Using a lower volume setting
5
) Using Mute whenever possible
I
mportant:
T
he detector’s
display will flash a “
I
I
”
and three fast beeps will sound when the
b
atteries have approximately one hour of
battery life left. This is a reminder to recharge
your batteries.
Battery Charging
P
P
o
o
w
w
e
e
r
r
C
C
o
o
r
r
d
d
: Plug included power cord into the
detector and into the lighter socket to slowly
charge the rechargeable batteries. This will also
provide power to the detector. The display will
dimly blink the “
I
I
I
I
I
I
” icon when the unit is
charging the batteries. When the power cable is
removed from the detector or the vehicle’s
lighter socket is switched off, the unit will alarm
and illuminate the icons in a sequencing fashion,
then turn off.
N
N
o
o
t
t
e
e
:
:
The unit will continue to charge when powered off
until it senses a full charge.
I
I
m
m
p
p
o
o
r
r
t
t
a
a
n
n
t
t
:
:
As with all battery operated devices, remove
the batteries when this unit will not be used for an
extended period of time. Damage caused by leaky or
improperly charged batteries are not covered under
warranty. Check with the battery manufacturer about
their specific product warranty and disposal
recommendations.
OPERATION
56
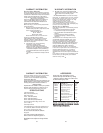
Rubber Bumper
Windshield
Mounting
U
nit Must Be Level
Power On and Self-Test
Each time your Whistler detector is turned on,
a
n automatic self-test sequence confirms that
t
he speaker and visual display is functional.
• Press Power. Display shows in order:
1.
X-Band
2.
K-Band
3
.
K
a-Band
4
.
L
ASER
5
.
S
WS
6
.
B
attery Status
7
7
.
.
H
ighway
Self Test Mute
Press the Quiet button during the self-test sequence
to cancel the self-test audio. This will not affect
radar/laser aler
ts. T
o r
estore the self-test audio, press
the Quiet button during the next self-test.
Setting Saver
Setting Saver saves your personalized settings
when the detector is turned off or you lose power.
Feature Engaged Confirmation
Each time a button is pressed, one beep confirms
feature “on”, two beeps confirm feature “off”.
Audio Level Adjustment
The audio levels can be adjusted high to low or
low to high.
• Press and hold the “VOL” button and the
volume level will increase (Level “
I
I
I
I
I
I
”) then
proceed to lower the volume (Level 0).
Continuing to hold this button will repeat the
sequence. As audio level is adjusted, beeps are
provided and the display indicates volume level.
OPERATION
7