Page 14 - Galaxy 3000 Plus
Starter Defeat Connectors
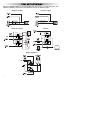
Using a volt/ohm meter locate the starter wire (normally a heavier gauge wire) at the ignition switch. This
wire will show +12V only during cranking. When this wire is cut the vehicle will be unable to start.
Locate the BROWN starter disable wire included with the wiring harness and cut in half. After cutting the
vehicle’s Connect one half to the cut side vehicle’s starter wire coming from the key switch. Connect the
other BROWN wire to the wire going to the starter.
Plug the female connectors on the BROWN wires to the .250 male spade lugs on the module. With the
BROWN wires connected to the module, the vehicle should be able to start.
Plug-in Connectors
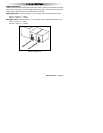
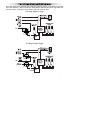
4-Pin White Connector: Plug-in connector port for dual stage shock sensor.
2-Pin Blue Connector: Plug-in connector port for program/service switch. Mount program switch in an
area that is easily accessible from the driver’s position.
2-Pin Red Connector: Plug-in connector port for LED. Mount LED in an area where it may be easily seen
from either side of the vehicle.
3-Pin White Door Lock Connector: Plug-in connector port for door lock harness or optional door lock
relay module (PDLM-3).
· BLUE WIRE - negative unlock output (-) 500mA and positive lock output (+) 250mA.
· RED WIRE - constant +12V low current output (+) for relay modules, or inverters. 100mA relay trigger
only. Do NO
T
use as a power source f
or door lock relays.
· GREEN WIRE - negative lock output (-) 500mA and positive unlock output (-) 250mA.
3-Pin Blue Network Connector: The plug-in network connector port is located on the side of the main
module. This network port may be used with the optional personal computer interface or Pocket PC for
diagnostics, software customization and expanded programming options. The network also offers
connection to several optional accessories.
See your dealer for more information.
Real-time Sensor Adjustment Mode
This mode allows active testing of the shock sensor and making adjustments without arming the alarm.
To enter Sensor Adjustment mode:
1. Turn on the ignition.
2. Within 5 seconds, press the Shift Button 3 times followed by Button 3.
· The siren will chirp 4 times, indicating that the sensors are ready to be tested.
3. Turn off the ignition and test the sensitivity. The siren will chirp each time a sensor is disturbed.
· The siren will chirp 1 time for Shock Sensor trigger.
· The siren will chirp 2 times for Warn Away trigger.
· The siren will chirp 3 times for Optional Sensor trigger.
4. When the sensors are properly adjusted, turn on and off the ignition to exit adjust mode.


