8
Chapter 1
How to Use Remote Control and Names of Parts
Setting and removing the disc
Insert the disc in the Disc loading slot with the
label-side up. To remove the disc, press the Disc
eject button on the right-hand side of the Disc
loading slot.
❒ Do not try to use discs other than a disc
designed for this system. Please use only the
disc specified by Pioneer.
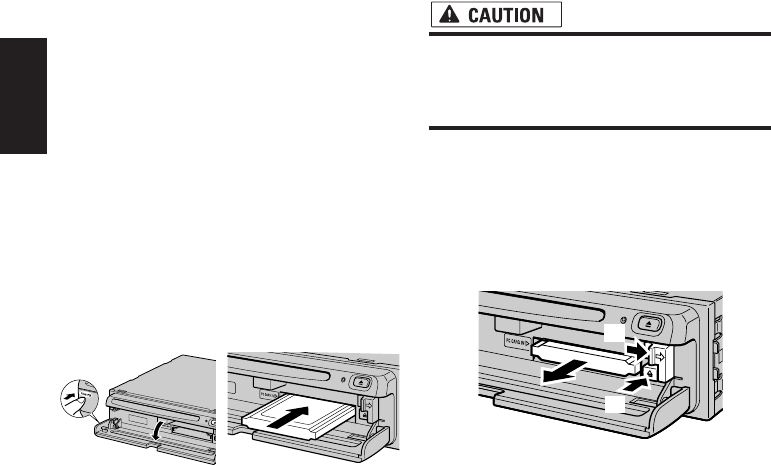
Setting the PC card
Open the cover at the front of the main unit. Hold
the PC card label-side up: the arrow shows the
direction of insertion. Insert the card firmly until
the PC card eject button pops out. If the main
unit power is on, the PC card lock lamp changes
from green to red, showing that the PC card is
inserted correctly and ready for use.
Removing the PC Card
• Do not remove the PC card while the PC
card lock lamp is red. It may damage the
main unit of the Navigation System or the
PC card.
Open the cover on the front of the main unit.
Slide the PC card lock lever to the right (1), and
hold it there. Check that the PC card lock lamp
has changed to green, and then press the PC
card eject button (2). (Keep holding the PC card
lock lever to the right until the PC card is
removed completely.)
❒ PC card can be set or removed regardless of
the power ON/OFF of the main unit (ON/OFF
of the engine).
❒ You can only use a card that conforms to the
PCMCIA Type II (5V) standard. If you attempt
to use a card complying with a different stan-
dard, the card slot may be damaged, or a mal-
function may occur.
❒ Do not remove the card while editing the data
on the PC card. The data stored on the Navi-
gation unit and data on the PC card could be
corrupted.
(1)
(2)


